Showing posts with label Star Wars. Show all posts

Thursday, March 30, 2017

Hotlead 2017 Part II - My Part In Its Downfall

First, for all you kids out there, the title is a riff on the title of Spike Milligan's seven-part war memoir trilogy.  In actuality Hotlead is going strong and survived me, but below are the stories and hindsight from my two gaming sessions last weekend.

I put in to run two games, Silent Death Star Wars in The Force Awakens (Ep. VII) setting Friday night, and Song of Drums and Shakos (SDS) cinematic skirmish Sunday morning.  I chose those two timeslots in part because they're a more casual time to game during the weekend, unlike the hot and heavy (in all senses of those words) Saturday sessions.  And the SDS games in particular only take four players, and I didn't want to take up a whole table for a relatively small game.

For both games, my plan was to run multiple scenarios - for Silent Death so as not to overwhelm the players with handling multiple ships, and for SDS because I expected each game to be relatively short.  So I had three scenarios ready for Silent Death, expecting to get through two, and two ready for SDS, with the plan to have the players swap sides and play them again if the games went super-fast.

In the end, in both timeslots we played...one scenario.  For Silent Death, though the one played quickly, that seemed to be all the appetite people had, getting up to speed and re-setting for another game was more than they wanted to do on a Friday night with all the shopping potential in the hall.  I can dig that, and it wasn't like they didn't enjoy the game (more details below).

For SDS, the one scenario we had lasted almost three hours, so everyone got their fill and was ready to check out and head home.

So after this and my KEGSCon experience with SDS (which was like the Silent Death experience this time), I'm surrendering on the multiple scenarios in a timeslot idea.  I'm not sure what I'll do for Silent Death, as the problem of overwhelming players is still there, but it could be something like a scenario where you get reinforcements as the game progresses, so you start with one or two ships, but get more later.

For SDS, it's simpler, the four-player scenarios work well to fill a timeslot.  That also means less to pack!

😣😣😣

Getting into each of my games in more detail, I'll have to be the first to admit (because I can't really hide this below) that I forgot to take any pictures of my Star Wars game, and only a few mid-game and end-game of my Napoleonics skirmish.  GMing is a busy time!  If you want to see a pic of the Star Wars table, either check out the Friday night pics in the Hotlead Facebook group, or look at my pre-Hotlead post where I had a photo of a playtest game.

But despite the lack of visual documentation, I did indeed host a Silent Death game on Friday, for a full allocation of six players, though my buddy Ron helped fill in the last slot.  As mentioned, we only played the intro scenario "Last of the Red Hot Y-Wings", which has three TIE/sf fighters entering a system just behind a beat-up Rebellion-era Y-Wing (the only one that survived the first Death Star) piloted by a teenaged girl who's escaped in grandpa's Y-Wing with her boyfriend in the back seat and some secret First Order documents.  As it turns out, the system she's entered has a Resistance base, and three X-Wings rise to meet the challenge.

The game starts with the TIEs and X-Wings at either end of the map, and the Y-Wing just ahead of the TIEs (and their heavy weapons).  Each player has a TIE or X-Wing, and I controlled the Y-Wing, which only had to race ahead in a straight line.  The TIEs initially have to destroy or cripple the Y-Wing, but their orders change when they realize there's a Resistance base here.  The X-Wings initially have to save the Y-Wing, but that also changes when they see the TIEs trying to escape to report back to First Order HQ.

In this game, the Y-Wing got crippled pretty early, and then destroyed while limping along.  Much faster than anticipated, two TIEs also got blown up (on critical hits to their still unprotected reactors), and at that point we called it a game.  The First Order side, in their rush to retreat with the news of the Resistance base, didn't follow Boelcke's Dicta and gave the Resistance some easy flank or rear shots; they should have flown through the X-Wings and then come back out.  One X-Wing got beat up pretty badly in the exchange, but all in all the good guys had an easy time of it.

I had a good group of players, a father and two teenage boys, another boy (maybe 12) and two other adults.  Everyone seemed to have fun in the brief game, one of the teenagers downloaded the free classic-era Star Wars Silent Death rules that were in a magazine 20 odd years ago and are available online, so maybe they'll check that out and use their X-Wing (the game) ships for it.

😣😣😣

Sunday I set up a four-player version of "The Last Pig in Russia", which has very hungry French forces trying to round up some bacon (in the form of a live pig) in a Russian village in late 1812.  The Russians, of course, want to protect their holy Russian bacon.

I had a full table again, my friend Mike took on the French hussars with Roger running the French voltigeurs against young Roy (Russian infantry) and Dave (Cossacks).  The game got off to a pretty furious start, with Roger shooting the pig on turn two, but Roy - who rolled hot all game - getting troops to the wounded animal first and starting to haul it off the table their way.

The French suffered from some terrible rolling, and it looked like I was going to need the second scenario, when all of a sudden the tide turned a bit as the French got their act together.  

Here's a shot of just before that happened, with two Russian infantrymen hauling the pig away in the middle-right of the picture (clicking on the picture will bring up a larger view):
The Cossacks turned around from their sweep to the Russian right to come back to help and engage the hussars on their left, but the French broke through and some volley fire and sabre action lead to the poor Russian pair hauling the pig falling dead with the pig ON the table edge, as you see below in this photo from the end of the game (the pig was never picked up again):
It looked like maybe the tide had permanently turned, but the lone surviving hussar charged into the fray rather than grabbing the pig and riding off, and melee broke out everywhere amongst the survivors, and when the French NCO was killed, the game was over.  Just a lone Cossack and a half dozen Russian infantry were left, but that was enough.  The Russian infantry NCO was pretty heroic, beating off all sorts of melee attacks and cavalry charges against him.

Here's another shot of the table at the end of the game from the French side:
It was a fun game to GM and watch, the guys picked up most of the rules really quickly, and watching the tide of the game turn this way and that was great and got some attention from passersby and other tables.  Without really thinking about it, at one point in the game I referred to a wounded figure (wounded figures are removed as being out of action unless you're playing a campaign game) as being "functionally dead", and that became the catchphrase of the game.  Except when someone was tripled in a combat roll, which led to the catchphrase of "really dead dead".

So my first lesson learned was that a four player game is more than enough to fill a timeslot.  Secondly, my new player aid of "It's Your Turn" with the basics on it seemed to help, but I still was doing too much helicopter parenting of the players, rather than stepping them through the QRS' combat modifiers and results and letting them do the work.  It had nothing to do with the game system or the players, just me "hovering" a bit too much.

To help with that, for next time I think I'll come up with a new set of scenario sheets for the players that has just a very, very basic scenario into, simple victory conditions, and their figure stats, and then the "It's Your Turn" piece on the same sheet.  That plus the QRS with all the combat modifiers should help me (or at least remind me) to let them learn the game.  My big QRS on an easel will still be there to help too.

I also forgot the first time it came up to make a player check for morale because his force had hit 50% of its starting strength, but in the end I decided on the fly to overlook that for everybody.  This was a convention game, not a campaign game or a game between two experienced players, and it wouldn't have been fun for anyone to lose their force in the middle of the game.  Plus, a fight to the death made the game the drama that it was, and in this particular scenario, wasn't an unreasonable situation, particularly for the French.

So I think I'll ignore that 50% rule at conventions from now on - all the other reasons to check morale will still be there (leader death, cavalry charges, Green troops etc.), just not this one.  

😣😣😣

In the end then, I was pretty happy with the two games - full games, happy players, learned some things about GMing at a convention, and no disasters and no one flipped a table on me.  Next up will be Broadsword 3 in Hamilton in May, then maybe Cangames in Ottawa, and I'll look to run a game of something at each.


Wednesday, March 22, 2017

Hotleading!

Hotlead 2017 is only two days away and while I'm still three years behind on posting pictures from past Hotleads, here's a scoop on my games for this year's convention.  I have two game sessions planned, one Friday night, one Sunday morning, and this is the first time I'm running games at Hotlead.

First up Friday is a set of scenarios using the Silent Death space fighter rules in the Star Wars: The Force Awakens setting.  The ship designs are in their own little universe here, not balanced with the classic period SW ship designs I've had done for years (just waiting for me to finish painting the bleeping ships).  

The ships themselves are Titanium Black Series prepainted "diecasts" (if diescast = largely plastic) plus a couple of Hot Wheels ones thrown in.  A Rogue One ship slipped in, as before the movie came out I just thought it was a background SW:TFA ship, as did The Ghost from one of the animated series.

Here's a group shot of most ships (more TIEs have been added since):
Below are the Hot Wheels additions after a wash to dirty them up and a starry paint job on their bases.  The Corellian Corvette is actually going to be used in the classic period, I have a newfangled type I bought off Shapeways ages ago that will work better as a modern incarnation of the Corvette - once I paint the thing up!  The Y-Wing is too big to fit in with my classic-era Y-Wings from Studio Bergstrom, so it's here for the first scenario I'll be running Friday - Last of the Red Hot Y-Wings.  The granddaughter of the one surviving Y-Wing pilot from the attack on the first Death Star escapes from the First Order with grandpa's ship (and her boyfriend in the back), and X-Wings and TIE/sf ships get to fight over her.
Next, a shot partway through a playtest game of the second scenario, Knives to a Gunfight, that I played with my 6yo nephew last month.  I learned a few things (even the new First Order TIEs need help against X-Wings) as my nephew cleaned my clock!
The third scenario Friday, if we have time to get to it, will see the Resistance trying to shoot down Kylo Ren's shuttle as he escapes a planet after another fruitless search for clues as to Luke Skywalker's whereabouts.  It's entitled Fly Kylo Fly!

Then Sunday I'm going to run some 4-player Song of Drums and Shakos Napoleonics skirmish scenarios.  Learning from KEGSCon, I'm just putting on two scenarios, upscaled variants of The Last Pig in Russia and Troubles with the Ladies of Spain.

I cut off the top of the playing area, but here's the 3'x3' version of The Last Pig in Russia:
And I gamed it out one last time as I was packing it up, using the "set everything up and pack it up straight away" approach to making sure I didn't forget anything.
I'm free to game Saturday, so I hope to get into a 6mm I Ain't Been Shot Mum game, maybe some ancients, and then I have a plethora of options Saturday night, including more ancients, samurai with rules I really want to try, and a game of The Pikeman's Lament, for which I already have a project planned and purchased!

I also hope to pick up some more 15mm 4Ground terrain and vehicles and bits and pieces for 20mm Chain of Command.

Sunday, February 5, 2012

Blasters and Bulkheads Game 3 - Raid on the Rabid

Hmmm, this took longer than I had planned, but I have a couple of back to back blog updates that have been sitting on my camera for over a month. January is a busy month for travel for me in the real world, so the last few weeks of not much happening in terms of painting etc. wasn't surprising, but this game of Blasters & Bulkheads is from early in the new year.

As you'll recall, in the first game Chewbacca was a casualty and captured by the Imps. In the second game, the rebels successfully captured documents telling them where Chewbacca was being held. So in this third game two task forces, one under Luke, one under Han, raided the Imperial frigate the Rabid to rescue Chewie.

The ship tiles are from Fat Dragon, and most of the 3D props are too, though some are from WorldWorks and others from Micro Tactix. One of my goals in this game was to try out the Essence (aka Force) rules, using Luke. I also gave the rebels a randomly determined secondary goal of having R2D2 download data from one of the computer terminals throughout the ship. Other possible secondary missions included rescuing the other prisoner, capturing an officer, stealing a shuttle, and disabling the engines.

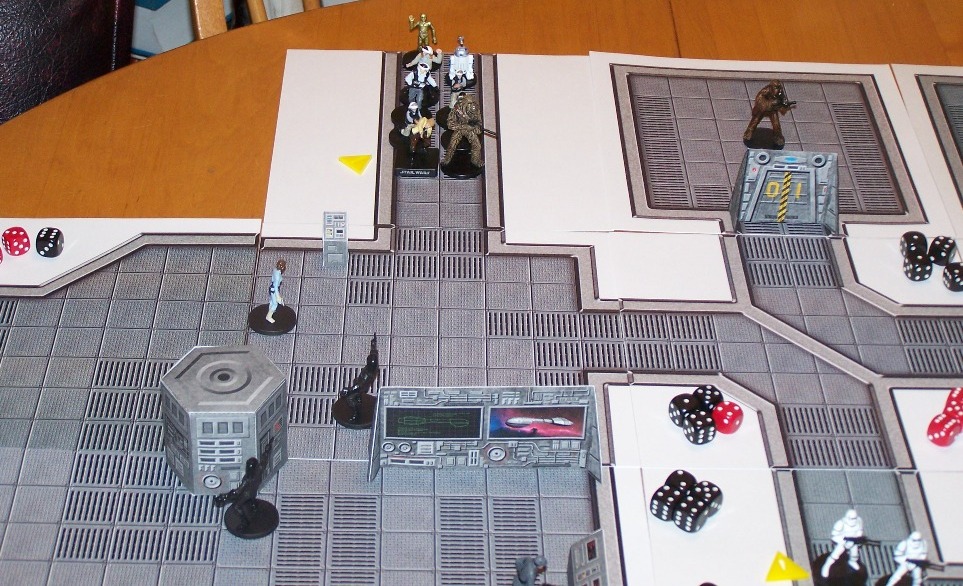
This first pic is from the end of the first turn, the rebels have entered the Rabid at two (randomly determined) points, on the left is Team Skywalker, working towards the engine room, on the right is Team Solo, working towards the prison cells. The Imperial patrols' direction had been randomly determined, and they were programmed to move in that direction until an alert had been given.


A close-up of Team Skywalker - Luke, R2D2, C3PO, another wookie, and a team of troopers:
Team Solo - Han, Leia, and a team of commandos:
By the end of the second turn both rebel teams have been spotted, and the rebel troopers have been whittled down in Team Skywalker. Han did a good job wiping out most of the Imperial naval troopers guarding the bridge, but there are a team of stormtroopers still coming up behind them and cutting off Leia.

At the end of turn 3, things are getting worse for the rebels. The stormtroopers won their showdown with the rebel commandos, and two patrolling stormtrooper NCO's finished off the rebel troopers in Team Skywalker. Somehow the wookie in Team Skywalker was unable to do anything to a simple naval tech in hand to hand combat!

Things are pretty much done for the rebels now, despite Han wiping out another naval patrol. The wookie is down, and R2 and C3PO have retreated back to their ships, and Luke is just finishing off his combat before retreating too.
So the rebels are in deep trouble now, the heroes barely got off ship before it entered hyperspace, and Chewie is still a prisoner.

I think I made a few mistakes in setting the game up. Because I hadn't statted up individual stormtroopers, the stormtrooper patrol consisted of two NCO's, who are better quality than typical stormtroopers should be. The techs in engineering were in the same boat, they should have been done up as henchmen. The end result was there were way too many Fate Dice in play for the Imperials.

I haven't figured out what my next game will be, I'm moving towards playing some Songs of Blades & Heroes fantasy next, and need to spend some time building some more cardboard terrain. But somehow, Chewbacca must be rescued!

Saturday, December 31, 2011

Run Through the Jungle

Before I head out for the evening, here's an AAR for game two of my Blasters & Bulkheads Star Wars experience. This was a variation of Scenario 3 (without a vehicle), where one side has to go from corner to corner through a forest/jungle.

The Imperials were the runners, the rebels were the ambushers. Since Chewbacca was knocked out, and (in my head) declared captured, the rebels also wanted to capture or kill an Imperial officer in order to find Chewie's whereabouts.

The table at game start. Luke, Han, Leia, a Wookie, and a squad of troopers are in hiding, awaiting the arrival of two Imperial field officers, a stormtrooper officer, stormtrooper NCO, and a squad of scout troopers (upper right corner). The yellow poker chips denote potential hiding spots for the rebels. They're labelled 1-10, and the five rebel characters/units are off-tabled marked 1-5. They'll be revealed either of their own volition, or if the Imperials successfully spot them. Three of the markers are in the tops of the big trees (fancy tea light holders).

Two main trail options were given to the Imperials, with one of them branching off into another side trail. Their initial plan was to get to that side trail and take it, based on where the potential ambush sites were.

Billy the Bronchosaurus is in the upper left corner, and he was supposed to wander randomly (and placidly) through the scenery, but he randomly ended up off table and I gave up on him after a few turns.

The end of Turn 1. The wookie was spotted on the Imperials second attempt (by the NCO) but wasn't initially hit. On his turn he popped out from behind the tree, shot down three scout troopers, and got in behind the tree. Unfortunately the rest of the Imperials dropped him in turn.

Luke was also revealed, in his perch in the big tree. He put a few hits on one of the field officers, then escaped down the tree to get into the action (despite being on the table in this picture, I ruled it'd be two turns to get down the tree, so he's in mid-slide at this point).

The end of Turn 2. The rest of the scout troopers have been wiped out by Luke, and the Imperials have made their initial choice of what trail to take. The rebels got their troopers on the move, to get them into a new position.

The end of Turn 3. The Imperials are progressing down the trail, spotting as they go (the other two big trees have been found clear of targets, and Princess Leia has been outed). The rebel troopers are getting into position behind a downed column of the Ancients, and Luke is trying to catch up but is hampered by the slow terrain. The red marker near Luke was the impact point of a stun grenade thrown by the stormtrooper NCO.

The end of Turn 4. Han is now in the game, and Leia has moved to her backup position (behind one of the planet's plentiful purple rocks). The stormtrooper office is prone behind some bushes, and the rest of the Imperial survivors are playing leapfrog behind terrain. You can see where the rebel troopers flurry of grenades landed (red marker between stormtroopers), but no one got hurt!
The yellow markers just indicate who moved first or second in the turn, as in the game they get bonuses. Eventually, with better (permanent) character sheets, there will be a way to do this off-table.

The end of Turn 5. The table's really getting busy now. Leia is hurt badly, Han has taking some burns, and the Imperials are still dodging from shrub to shrub. Way in the back, Luke is finally about to get free from the forest terrain.

The end of Turn 6 - we have a princess down! Now Han is really mad, and is charging along the side trail the Imperials decided not to take when they found Leia and Han in wait down it. All four Imperial characters are still in action.

The end of Turn 7. But now there aren't four surviving Imperials. The stormtrooper officer was taken out by the rebel troopers repositioning themselves, and one field officer was shot in the back by Angry Han. He's exposed to the stormtrooper NCO, but he's also going after that last officer before he can escape off the board.

A nice "movie" view of the same scene.

The end of the game (after turn 8). The officer got off board, and the NCO pretty much got surrounded and I ruled he surrendered, since he knows rebels don't shoot their prisoners. Of course, after some subsequent counselling from Han, he gave away Chewbacca's location...

And here it is, a teaser for my next game. The rebels are launching a boarding action on the Imperial customs frigate "Rabid" before it goes to hyperspace. Chewbacca is in one of the frigate's cells. The tiles and props are from Fat Dragon, with some Worldworks and Micro Tactics thrown in. This game will have Luke the Jedi Apprentice make an appearance, so I can get in some Essence (Force) powers.

The bridge of the "Rabid".

Tomorrow I'll post a review of my 2011 actual production vs. my resolutions, and a plan for 2012.

Thursday, December 29, 2011

Battle at Starport Omega (Blasters & Bulkheads)

Had a chance to try out the Blaster & Bulkhead rules yesterday, after getting some paper terrain (Micro Tactix's Starport Omega) made last week and statting up some Star Wars characters and henchmen after Christmas. Statting everyone up was rather straightforward, although I'll need to think if there's any real difference between say an Old Republic soldier and a Rebel trooper and a New Republic soldier (probably not). I still have more to do, but will be doing that in an Excel spreadsheet rather than by hand, albeit not a spreadsheet that calculates things automatically, just one that will be neater than my handwriting!

I played out Scenario One from the rulebook, a simple three turn stand up fight. I didn't use any Jedi or Sith, just to keep things simple while I learned the rules, and things like grenades, vehicles, and mounts are for another day.

I made one miscalculation during set-up, since I don't currently have space for my larger terrain mat, I used a 3'x3' mat instead of the 4'x4' recommended for larger figures (I'm using the collectible pre-paints). However, I didn't then reduce the point totals by 25% to account for the smaller space, and the table was pretty crowded. The battle ended up being a bit of a bloodbath, rather than seeing much maneuver or brilliant generalship.

I also made a couple of slips during gameplay, usually forgetting to give a side their Attack or Defense re-rolls, but I think it balanced out. There may have been other rules I didn't catch here or there, but it went pretty smoothly for a first game.

The scenario had a force of Rebels, led by Han Solo, Chewbacca, and two NCO's, square off against an Imperial detachment under an Imperial field office, stormtrooper officer, and stormtrooper NCO. The rebels had four squads of five henchmen, one with a heavy repeating blaster, the Imperials had three stormtrooper squads, two squads of naval troops, and a scout trooper squad (all of five). One Stormtrooper squad had a missile launcher.

Both sides were basically out to inflict as much damage as possible, although I had tasked Han and Chewie to get into the starport office and up to the balcony, to get a height advantage on the Imperials. One squad of naval troops was assigned to get into a hangar and surprise the rebels from in there. We'll see how those two tactics faired...

Anyway, here are some pics:

The table at game start. While most of the terrain is Micro Tactix, the crates are from Worldworks. The vegetation is Xmas trees converted for warmer weather, fake grass mats, and some homemade stuff using aquarium plants. I also had three civilians around the shuttle in the middle, and another two in the starport office (middle left building), and I'd control them randomly (basically, they'd either run away or drop prone, maybe to crawl away later).

The rebels are to the bottom, the Imperials at the top.

A close-up of our heroes as the game began. The squad with them was supposed to provide cover as they charged towards the offices, then get out of the way and let the HW squad own the firing lane. We'll see how that worked...

A close-up of the Imperials, the naval troops in a line across the back were assigned to get in through a back door in the hangar and come out the front, surprising the rebels. We'll see how that turned out...

The end of Turn 1. Han and Chewie, with their squad, are charging towards the office door. The Imperial HW squad was blown away, except for the guy with the missile. They'll pay for missing him... The rebel NCO on the right (behind the beacon, in a brown uni) also single-handedly took out a squad of stormtroopers, leaving the Imperial field officer all by his lonesome (in white jacket, to right of hangar). The other rebel NCO, hiding behind the crate by the shuttle, took some damage from the other naval trooper squad, however. He would get his revenge.

Meanwhile, behind the other hangar, a Mexican stand-off was developing.

Big hole here for the Imperials, with most of a squad gone, the office, NCO, and second squad are rushing up to fill the game. The second naval squad is also taking some hits.

End of Turn 2. We have a Wookie down! The lone HW team member still had the missile launcher, which he fired and managed to not do any damage to the rebel squad he was aiming at. However, both Han and Chewbacca were in the blast radius, and took the max. 2 hits. The other stormtroopers then pummelled them with blaster fire, not doing any more damage to Han, but KO'ing Chewie. For cinematic reasons of course he had to live, but he ain't going anywhere at the moment.

The rebel squad on the far right also took damage, losing three team members behind the hangar. With things in a bit of a mess, and their firing lane not clear, I decided to bring out the rebel's HW squad, coming up behind one of the NCO's to offer some support.

You can see more clearly here that the naval squad that ran through the hangar sprang their surprise...but without a real target. For simplicity's sake I removed the hangar once the Imps opened all the doors, exposing the interior.

By the way, the civilians lying down are just prone, not dead, although the one near the beacon (green shirt) has taken 5 hits for his troubles (being too close to the rebel NCO behind the crate). He crawled out of the way this turn.

The dead pool after Turn 2. Looking good for the rebels so far...

The table at the end of Turn 3. Not sure who won. The rebels had the squad in front of the office wiped out, a second squad is down to one man, and Chewbacca's on the tarmac for the surviving stormtroopers to pick up. On the other hand, the naval squad in the hangar is toast, and the last surviving stormtrooper squad has lost a couple of its members.

And Han has made it into the office, and is about to get into the elevator to take him up to the second floor, giving him a nice shooting perch. The two civilians here are hiding under their desks.

The final dead pool. Twenty dead Imps, 12 dead rebels, plus a downed Wookie. Probably a very minor rebel victory in terms of points.

All in all it was a fun game, and I look forward to getting into it more for Star Wars, and maybe some of my other sci-fi projects (15mm Traveller/Firefly/Starship Troopers, 25mm Star Trek). I'm working on the character sheet spreadsheet and a QRS, there's a lot of page flipping going on right now. I had only a few questions about the rules that I'm going to ask on the Goalsystem mailing list.

In particular it was nice that B&B is already weighted towards Star Wars, there wasn't any heavy thinking to stat anybody up based on the movies (the original ones!) and literature.

Even though I have a few rulesets I'm happy with for pulp, retro sci-fi, and Victoriana, I think I may pick up the other Goalsystem rules for those eras.

Next up is a foot-bound version of Scenario 3, a running gun fight through a forest (don't have a vehicle to do the proper scenario). I'll try out grenades during it, then next up is a fight aboard a spaceship using Fat Dragon's Starship Tiles. For that I'll bring Luke the Jedi Apprentice out and try Force (Essence in the B&B rules) powers.

Monday, November 21, 2011

Star Wars Timeline

There's been a lot of discussion about Star Wars, where Lucas went wrong (if anywhere), and how people game the setting. From past posts it's obvious I love Star Wars and have plans to game it in 2mm (big battles), 28mm (skirmish), and fighter-scale and fleet-scale space battles.

However, I am a fan chiefly (essentially exclusively) of the original trilogy and assorted fluff that came out from that, up to and including Timothy Zahn's sequel trilogy (which chould have been filmed, if anything, as episodes 7-9) and some of Michael Stackpole's Rogue and Wraith Squadron series.

The prequel trilogy just had too much wrong with it, both from a movie-making point of view - I still can't figure out some of the plots going on - and from a backwards continuity point of view. Anakin Skywalker was too young, the Clone Wars would have been AGAINST the clones (not with), and there's no way Anakin/Vader had an idea he had twins, much less had a past on Tattoine.

So working with the canon timeline as a starting point, I've written my own timeline and incorporated it into my rules conversions, just as a refresher as to what's going on. I will even do some gaming in pre-Episode IV periods, but according to my feelings for what was going on.

So, for what it's worth, here's my history, starting with the birth of Chewbacca. BE = Before Empire, NO = New Order (Empire's founding), BBY = Before the Battle of Yavin (= 19 years, 4 months after Empire founded), where a number follows a slash, that is the month of that year.

181 BE – Chewbacca born on Kashyyyk.

55 BE – Palpatine born on Naboo.

52 BE – Obi Wan Kenobi born (71 BBY).

50 BE – Palpatine joins the Jedi Order as a padawan apprentice.
50 BE – The Old Republic has become stagnant, complacent, even corrupt. The reputation of the Jedi has become tainted by their association with politicians and politics.

48 BE – Obi Wan Kenobi joins the Jedi.

37 BE – Anakin Skywalker born (56 BBY).

32 BE – Major advances in cloning made, initially can grow adult clones in two years, later (by start of clone wars) this increases to 6 weeks. Initial successes tempered by instability in the clones, either physiological or psychological. Some improvements made, by never entirely eliminated.

30 BE – Palpatine elected Sectorial Senator, representing many systems, and resigns from the Jedi Order, discovers secrets of the Sith and begins to explore the Dark Side of the Force and restoring the Sith cult. He later uses the cover of Darth Sidious in some of his clandestine meetings, but he is not a true Sith Lord, preferring his own path to power.

28 BE – Anakin Skywalker is discovered by Jedi Knight Qui-Gon Jinn, who recognizes his strength in the force. Over the opposition of the Jedi Council, including Yoda, he becomes Jinn’s padawan. The other Jedi warn that Anakin is too emotional, too temperamental, despite his great power with the Force, to be a Jedi. When Jinn is killed shortly thereafter, Kenobi takes over as Skywalker’s master.

26 BE – First mass-cloning facilities built, intended to create soldiers for the Old Republic, reducing the need for citizens to serve. First military units available shortly thereafter. Templates for clones taken from existing Old Republic soldiers and officers, as well as mercenaries (Mandalorians) and bounty hunters.

24 BE – Palpatine takes Darth Maul as his apprentice in the Sith.

23 BE – First coup attempt by a Republican general empowered by his massive number of available clones. Coup is stopped by the Jedi, but this unleashes the clones themselves, now self-lead and rebelling all over the Old Republic – the start of the Clone Wars. The clones are able to reproduce and reinforce themselves quickly, having first secured all major cloning facilities. The clones regularly commit atrocities, from massive orbital bombardment to death squads, as their mental instability dominates their behaviour. Palpatine covertly aids the clones, hoping to eventually step in and gain control of them. Their souless-ness however, hinders his ability to control them with the Force and he does not overplay his hand.

21 BE – Senator Palpatine is elected Supreme Chancellor of the Republic.

19 BE – Obi Wan Kenobi is made a General in the Old Republic (Grand Army of the Republic). He and Anakin Skywalker serve together.

17 BE – Clone Wars end with the victory of a much-weakened Old Republic (36 BBY). All clone vats and clones themselves destroyed, but both individuals and facilities do escape.
17 - 0 BE – Fall of the Old Republic (36-19 BBY) as a weakened Jedi Order and Republican Senate has difficulty controlling the outer fringes of the Republic as well as internal power-plays by worlds and corporations. Violence, trade disputes, political deadlocks all follow. Later in the period, the Jedi are increasingly discredited through a propaganda campaign orchestrated by Supreme Chancellor Palpatine. The order starts to fall apart, with fewer recruits, fewer resources, increasing “disappearances” and other losses to its membership. It is, however, still a force to be reckoned with.
17 BE – Anakin Skywalker first approached by Palpatine and given hints as to where teachings on the dark path to greater power could be found.

16 BE – Han Solo born on Corellia.

0 BE – Skywalker twins are born after Queen Amidala is spirited away from Anakin Skywalker by Obi Wan Kenobi and those loyal to the Old Republic. Amidala is hidden within the Royal Household of Alderaan, in Bail Organa’s family’s service as a nursemaid and servant (tutor). The daughter is kept as Bail Organa’s “daughter”, the son is taken by Kenobi back to Tattoine to be raised by Owen and Beru Lars; Owen Lars is a cousin of Anakin Skywalker. Kenobi stays nearby to protect the son, but Lars’ isolation as a farmer works well. Anakin was only vaguely aware his wife was pregnant, as he was busy serving Senator Palpatine and saw her only rarely. She had also concealed she was pregnant with twins.
0 BE – Anakin Skywalker finishes his fall, becomes Darth Vader after he and Obi Wan Kenobi battle at Mustafar and he is thrown into the lava pits. The massive damage he sustains leaves him dependent on his protective armor and life-support, and limits his powers in the Force.
0 BE – Empire declared, with Palpatine becoming Emperor, now year 1 of the New Order (NO). Emperor makes Darth Vader the Dark Lord of the Sith, his special agent to deal with the Jedi and ensure the security of the state. Palpatine renames the Senate as the Imperial Senate, with limited power and controls.

1 - 10 NO – The Jedi Purge, orchestrated by Emperor Palpatine, conducted by Vader and Imperial forces under his control.
1 NO – Queen Amidala, living under the name Padme, dies on Alderaan.

2 NO – Stormtroopers, using armor based on those of the clones during the Clone Wars, appear as the new standard line unit in the Empire.
2 NO – Eye of Palpatine station begun, later destroyed.

7 NO – Ghorman massacre, Captain Tarkin promoted to Moff as a result.

11 NO – Darth Vader finally has time to search for his lost child (not realizing there were twins), finds no trace and dismisses the search.
11 NO – Death Star design work begins, Grand Moff Tarkin in command.

16 NO – ISD design finalized, orders begun.
16 NO – Death Star design finalized, completed prototype components joined, construction of remaining sections begun.

17/6 NO – Corellian Treaty signed, Rebel Alliance is formed, first HQ is on Chrellis.
17/6 NO – Mon Calamari ships ordered to be constructed in secret for the rebels.
17/8 NO – X-Wing plans stolen by fleeing design engineers, turned over to rebels.
17/9 NO – Construction of first SSD’s begun.

18/4 – Rebel HQ moves to Orion IV, then begins moving every 6 weeks or so, until it ends up on Dantooine.
18/6 NO – First ISD’s received and operational by the Imperial Navy.
18/7 NO – First X-Wing fighters completed by rebels.
18/10 NO – Death Star plans stolen.
18/12 NO – Death Star plans uploaded to consular ship Tantive IV by rebel spies.

19/1 NO – Princess Leia and Tantive IV captured by Darth Vader; he reports it destroyed with all hands lost.