Saturday, December 31, 2011

Run Through the Jungle

Before I head out for the evening, here's an AAR for game two of my Blasters & Bulkheads Star Wars experience. This was a variation of Scenario 3 (without a vehicle), where one side has to go from corner to corner through a forest/jungle.

The Imperials were the runners, the rebels were the ambushers. Since Chewbacca was knocked out, and (in my head) declared captured, the rebels also wanted to capture or kill an Imperial officer in order to find Chewie's whereabouts.

The table at game start. Luke, Han, Leia, a Wookie, and a squad of troopers are in hiding, awaiting the arrival of two Imperial field officers, a stormtrooper officer, stormtrooper NCO, and a squad of scout troopers (upper right corner). The yellow poker chips denote potential hiding spots for the rebels. They're labelled 1-10, and the five rebel characters/units are off-tabled marked 1-5. They'll be revealed either of their own volition, or if the Imperials successfully spot them. Three of the markers are in the tops of the big trees (fancy tea light holders).

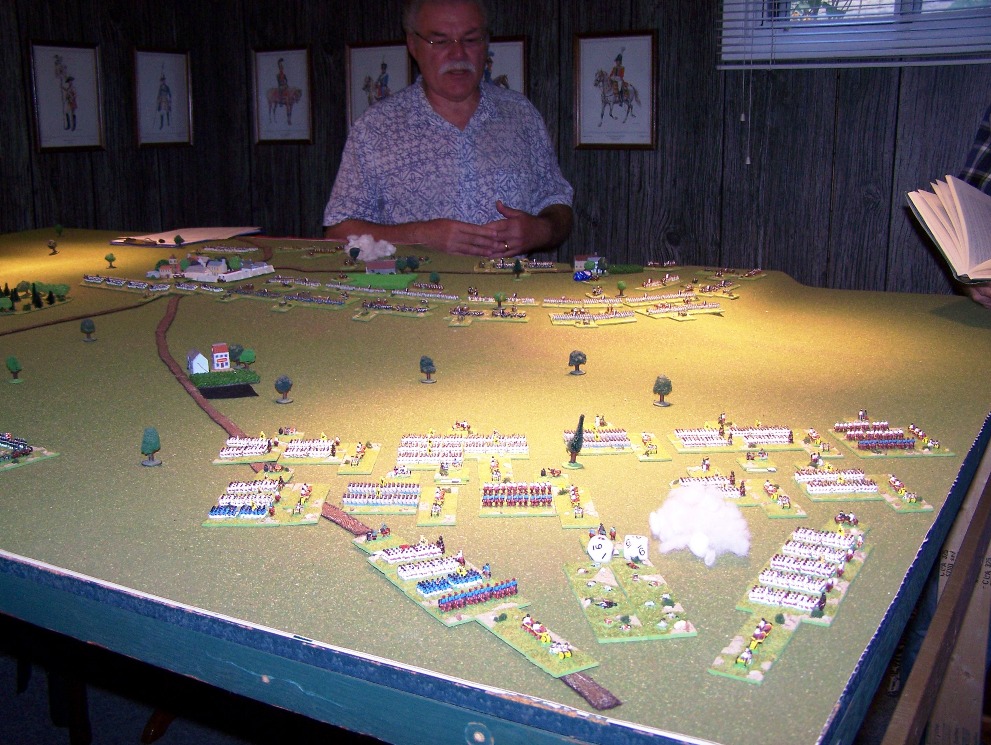
Two main trail options were given to the Imperials, with one of them branching off into another side trail. Their initial plan was to get to that side trail and take it, based on where the potential ambush sites were.

Billy the Bronchosaurus is in the upper left corner, and he was supposed to wander randomly (and placidly) through the scenery, but he randomly ended up off table and I gave up on him after a few turns.

The end of Turn 1. The wookie was spotted on the Imperials second attempt (by the NCO) but wasn't initially hit. On his turn he popped out from behind the tree, shot down three scout troopers, and got in behind the tree. Unfortunately the rest of the Imperials dropped him in turn.

Luke was also revealed, in his perch in the big tree. He put a few hits on one of the field officers, then escaped down the tree to get into the action (despite being on the table in this picture, I ruled it'd be two turns to get down the tree, so he's in mid-slide at this point).

The end of Turn 2. The rest of the scout troopers have been wiped out by Luke, and the Imperials have made their initial choice of what trail to take. The rebels got their troopers on the move, to get them into a new position.

The end of Turn 3. The Imperials are progressing down the trail, spotting as they go (the other two big trees have been found clear of targets, and Princess Leia has been outed). The rebel troopers are getting into position behind a downed column of the Ancients, and Luke is trying to catch up but is hampered by the slow terrain. The red marker near Luke was the impact point of a stun grenade thrown by the stormtrooper NCO.

The end of Turn 4. Han is now in the game, and Leia has moved to her backup position (behind one of the planet's plentiful purple rocks). The stormtrooper office is prone behind some bushes, and the rest of the Imperial survivors are playing leapfrog behind terrain. You can see where the rebel troopers flurry of grenades landed (red marker between stormtroopers), but no one got hurt!
The yellow markers just indicate who moved first or second in the turn, as in the game they get bonuses. Eventually, with better (permanent) character sheets, there will be a way to do this off-table.

The end of Turn 5. The table's really getting busy now. Leia is hurt badly, Han has taking some burns, and the Imperials are still dodging from shrub to shrub. Way in the back, Luke is finally about to get free from the forest terrain.

The end of Turn 6 - we have a princess down! Now Han is really mad, and is charging along the side trail the Imperials decided not to take when they found Leia and Han in wait down it. All four Imperial characters are still in action.

The end of Turn 7. But now there aren't four surviving Imperials. The stormtrooper officer was taken out by the rebel troopers repositioning themselves, and one field officer was shot in the back by Angry Han. He's exposed to the stormtrooper NCO, but he's also going after that last officer before he can escape off the board.

A nice "movie" view of the same scene.

The end of the game (after turn 8). The officer got off board, and the NCO pretty much got surrounded and I ruled he surrendered, since he knows rebels don't shoot their prisoners. Of course, after some subsequent counselling from Han, he gave away Chewbacca's location...

And here it is, a teaser for my next game. The rebels are launching a boarding action on the Imperial customs frigate "Rabid" before it goes to hyperspace. Chewbacca is in one of the frigate's cells. The tiles and props are from Fat Dragon, with some Worldworks and Micro Tactics thrown in. This game will have Luke the Jedi Apprentice make an appearance, so I can get in some Essence (Force) powers.

The bridge of the "Rabid".

Tomorrow I'll post a review of my 2011 actual production vs. my resolutions, and a plan for 2012.

Thursday, December 29, 2011

Battle at Starport Omega (Blasters & Bulkheads)

Had a chance to try out the Blaster & Bulkhead rules yesterday, after getting some paper terrain (Micro Tactix's Starport Omega) made last week and statting up some Star Wars characters and henchmen after Christmas. Statting everyone up was rather straightforward, although I'll need to think if there's any real difference between say an Old Republic soldier and a Rebel trooper and a New Republic soldier (probably not). I still have more to do, but will be doing that in an Excel spreadsheet rather than by hand, albeit not a spreadsheet that calculates things automatically, just one that will be neater than my handwriting!

I played out Scenario One from the rulebook, a simple three turn stand up fight. I didn't use any Jedi or Sith, just to keep things simple while I learned the rules, and things like grenades, vehicles, and mounts are for another day.

I made one miscalculation during set-up, since I don't currently have space for my larger terrain mat, I used a 3'x3' mat instead of the 4'x4' recommended for larger figures (I'm using the collectible pre-paints). However, I didn't then reduce the point totals by 25% to account for the smaller space, and the table was pretty crowded. The battle ended up being a bit of a bloodbath, rather than seeing much maneuver or brilliant generalship.

I also made a couple of slips during gameplay, usually forgetting to give a side their Attack or Defense re-rolls, but I think it balanced out. There may have been other rules I didn't catch here or there, but it went pretty smoothly for a first game.

The scenario had a force of Rebels, led by Han Solo, Chewbacca, and two NCO's, square off against an Imperial detachment under an Imperial field office, stormtrooper officer, and stormtrooper NCO. The rebels had four squads of five henchmen, one with a heavy repeating blaster, the Imperials had three stormtrooper squads, two squads of naval troops, and a scout trooper squad (all of five). One Stormtrooper squad had a missile launcher.

Both sides were basically out to inflict as much damage as possible, although I had tasked Han and Chewie to get into the starport office and up to the balcony, to get a height advantage on the Imperials. One squad of naval troops was assigned to get into a hangar and surprise the rebels from in there. We'll see how those two tactics faired...

Anyway, here are some pics:

The table at game start. While most of the terrain is Micro Tactix, the crates are from Worldworks. The vegetation is Xmas trees converted for warmer weather, fake grass mats, and some homemade stuff using aquarium plants. I also had three civilians around the shuttle in the middle, and another two in the starport office (middle left building), and I'd control them randomly (basically, they'd either run away or drop prone, maybe to crawl away later).

The rebels are to the bottom, the Imperials at the top.

A close-up of our heroes as the game began. The squad with them was supposed to provide cover as they charged towards the offices, then get out of the way and let the HW squad own the firing lane. We'll see how that worked...

A close-up of the Imperials, the naval troops in a line across the back were assigned to get in through a back door in the hangar and come out the front, surprising the rebels. We'll see how that turned out...

The end of Turn 1. Han and Chewie, with their squad, are charging towards the office door. The Imperial HW squad was blown away, except for the guy with the missile. They'll pay for missing him... The rebel NCO on the right (behind the beacon, in a brown uni) also single-handedly took out a squad of stormtroopers, leaving the Imperial field officer all by his lonesome (in white jacket, to right of hangar). The other rebel NCO, hiding behind the crate by the shuttle, took some damage from the other naval trooper squad, however. He would get his revenge.

Meanwhile, behind the other hangar, a Mexican stand-off was developing.

Big hole here for the Imperials, with most of a squad gone, the office, NCO, and second squad are rushing up to fill the game. The second naval squad is also taking some hits.

End of Turn 2. We have a Wookie down! The lone HW team member still had the missile launcher, which he fired and managed to not do any damage to the rebel squad he was aiming at. However, both Han and Chewbacca were in the blast radius, and took the max. 2 hits. The other stormtroopers then pummelled them with blaster fire, not doing any more damage to Han, but KO'ing Chewie. For cinematic reasons of course he had to live, but he ain't going anywhere at the moment.

The rebel squad on the far right also took damage, losing three team members behind the hangar. With things in a bit of a mess, and their firing lane not clear, I decided to bring out the rebel's HW squad, coming up behind one of the NCO's to offer some support.

You can see more clearly here that the naval squad that ran through the hangar sprang their surprise...but without a real target. For simplicity's sake I removed the hangar once the Imps opened all the doors, exposing the interior.

By the way, the civilians lying down are just prone, not dead, although the one near the beacon (green shirt) has taken 5 hits for his troubles (being too close to the rebel NCO behind the crate). He crawled out of the way this turn.

The dead pool after Turn 2. Looking good for the rebels so far...

The table at the end of Turn 3. Not sure who won. The rebels had the squad in front of the office wiped out, a second squad is down to one man, and Chewbacca's on the tarmac for the surviving stormtroopers to pick up. On the other hand, the naval squad in the hangar is toast, and the last surviving stormtrooper squad has lost a couple of its members.

And Han has made it into the office, and is about to get into the elevator to take him up to the second floor, giving him a nice shooting perch. The two civilians here are hiding under their desks.

The final dead pool. Twenty dead Imps, 12 dead rebels, plus a downed Wookie. Probably a very minor rebel victory in terms of points.

All in all it was a fun game, and I look forward to getting into it more for Star Wars, and maybe some of my other sci-fi projects (15mm Traveller/Firefly/Starship Troopers, 25mm Star Trek). I'm working on the character sheet spreadsheet and a QRS, there's a lot of page flipping going on right now. I had only a few questions about the rules that I'm going to ask on the Goalsystem mailing list.

In particular it was nice that B&B is already weighted towards Star Wars, there wasn't any heavy thinking to stat anybody up based on the movies (the original ones!) and literature.

Even though I have a few rulesets I'm happy with for pulp, retro sci-fi, and Victoriana, I think I may pick up the other Goalsystem rules for those eras.

Next up is a foot-bound version of Scenario 3, a running gun fight through a forest (don't have a vehicle to do the proper scenario). I'll try out grenades during it, then next up is a fight aboard a spaceship using Fat Dragon's Starship Tiles. For that I'll bring Luke the Jedi Apprentice out and try Force (Essence in the B&B rules) powers.

Works in Progress

Well it's still been a while since my last post, and I'll be returning to Star Wars again shortly (like tomorrow), but with some time off between the holidays, here are some pics of what's on the painting table.

First are yet another set of old (1980s) 25mm fantasy figs that have been waiting 25+ years for their moment of glory. Instead, I'm using them to practice my big fig painting skills, trying out different techniques I've read of. The one exception is one of Parroom Station's Earthmen on Mars (the daft looking one), who's getting another couple of painting techniques tried on him.

Swirlin, the magician in purple, was one of my first two D&D characters, he died on his first adventure, and was replaced by Zerlin, who also died on his first adventure. Twirlin and Verlin were subsequent replacements, all dying on their first adventure. D&D was hard on first level mages!

In the purple fez is Ordant Five-Hands (the latter name coming from an angry barmaid), a later magician who actually survived several adventures. His greatest claim to fame was when the party was surprised at night by orcs. While the rest of the party was arming up, he cast his one ready spell and killed the orc leader. He promptly got clubbed unconscious and awoke to find the battle over and the orcs in retreat. His interpretation of events left him as the hero, which he re-told, and re-told, and re-told to his rather annoyed companions.

My other first D&D character was Rolstun Goldaxe, a dwarf, who survived everything, became wealthy, and was retired before something bad happened to him. I have his figure, but am saving it until my skills are better and he gets a worthy paint job.

Here are the rest of the guys I'm working on, sorry for the crappy photo but the "mostly white" paint jobs don't show up well in the flash. You can see the Liberace on Mars character with his flesh painted, a lizardman (who looks really good in the photo, better than I think of him in real life), a priest or prophet, and a guard. All are still in progress, it's slow painting characters rather than armies, it's always requiring switching paints and brushes.

I picked up a lot of Xmas trees last year from craft shops, department stores, and dollar stores. Most are winterized (i.e. coated in snow), but these ones weren't other than a white base. So I painted the base up to make them spring/summer/fall trees, and will add some flocking later. They'll crop up again in my next few posts.

I picked up some paper mache craft houses last year, and am working on these two (I have about four more of the same models) as 15mm village pieces. Rather simple looking, but they'll do cheaply for now until the rest of my stuff gets proper treatment. They'll also work nicely for Splintered Lands (anthropomorphic animals) gaming.

I also have a bunch of Creatology's tudor house wooden puzzles on the table. The three on the left are for 15mm gaming, the first two as Tudor houses, the third as a stone church. The one on the right will be a 28mm stone house (it has space left for a bigger door). A fifth one isn't here, it's going to be a 15mm wooden block house (sort of North American in style, for FIW gaming).

The roofs (rooves?) of the same from a different angle. I tried different techniques on them.

Monday, November 21, 2011

Star Wars Timeline

There's been a lot of discussion about Star Wars, where Lucas went wrong (if anywhere), and how people game the setting. From past posts it's obvious I love Star Wars and have plans to game it in 2mm (big battles), 28mm (skirmish), and fighter-scale and fleet-scale space battles.

However, I am a fan chiefly (essentially exclusively) of the original trilogy and assorted fluff that came out from that, up to and including Timothy Zahn's sequel trilogy (which chould have been filmed, if anything, as episodes 7-9) and some of Michael Stackpole's Rogue and Wraith Squadron series.

The prequel trilogy just had too much wrong with it, both from a movie-making point of view - I still can't figure out some of the plots going on - and from a backwards continuity point of view. Anakin Skywalker was too young, the Clone Wars would have been AGAINST the clones (not with), and there's no way Anakin/Vader had an idea he had twins, much less had a past on Tattoine.

So working with the canon timeline as a starting point, I've written my own timeline and incorporated it into my rules conversions, just as a refresher as to what's going on. I will even do some gaming in pre-Episode IV periods, but according to my feelings for what was going on.

So, for what it's worth, here's my history, starting with the birth of Chewbacca. BE = Before Empire, NO = New Order (Empire's founding), BBY = Before the Battle of Yavin (= 19 years, 4 months after Empire founded), where a number follows a slash, that is the month of that year.

181 BE – Chewbacca born on Kashyyyk.

55 BE – Palpatine born on Naboo.

52 BE – Obi Wan Kenobi born (71 BBY).

50 BE – Palpatine joins the Jedi Order as a padawan apprentice.
50 BE – The Old Republic has become stagnant, complacent, even corrupt. The reputation of the Jedi has become tainted by their association with politicians and politics.

48 BE – Obi Wan Kenobi joins the Jedi.

37 BE – Anakin Skywalker born (56 BBY).

32 BE – Major advances in cloning made, initially can grow adult clones in two years, later (by start of clone wars) this increases to 6 weeks. Initial successes tempered by instability in the clones, either physiological or psychological. Some improvements made, by never entirely eliminated.

30 BE – Palpatine elected Sectorial Senator, representing many systems, and resigns from the Jedi Order, discovers secrets of the Sith and begins to explore the Dark Side of the Force and restoring the Sith cult. He later uses the cover of Darth Sidious in some of his clandestine meetings, but he is not a true Sith Lord, preferring his own path to power.

28 BE – Anakin Skywalker is discovered by Jedi Knight Qui-Gon Jinn, who recognizes his strength in the force. Over the opposition of the Jedi Council, including Yoda, he becomes Jinn’s padawan. The other Jedi warn that Anakin is too emotional, too temperamental, despite his great power with the Force, to be a Jedi. When Jinn is killed shortly thereafter, Kenobi takes over as Skywalker’s master.

26 BE – First mass-cloning facilities built, intended to create soldiers for the Old Republic, reducing the need for citizens to serve. First military units available shortly thereafter. Templates for clones taken from existing Old Republic soldiers and officers, as well as mercenaries (Mandalorians) and bounty hunters.

24 BE – Palpatine takes Darth Maul as his apprentice in the Sith.

23 BE – First coup attempt by a Republican general empowered by his massive number of available clones. Coup is stopped by the Jedi, but this unleashes the clones themselves, now self-lead and rebelling all over the Old Republic – the start of the Clone Wars. The clones are able to reproduce and reinforce themselves quickly, having first secured all major cloning facilities. The clones regularly commit atrocities, from massive orbital bombardment to death squads, as their mental instability dominates their behaviour. Palpatine covertly aids the clones, hoping to eventually step in and gain control of them. Their souless-ness however, hinders his ability to control them with the Force and he does not overplay his hand.

21 BE – Senator Palpatine is elected Supreme Chancellor of the Republic.

19 BE – Obi Wan Kenobi is made a General in the Old Republic (Grand Army of the Republic). He and Anakin Skywalker serve together.

17 BE – Clone Wars end with the victory of a much-weakened Old Republic (36 BBY). All clone vats and clones themselves destroyed, but both individuals and facilities do escape.
17 - 0 BE – Fall of the Old Republic (36-19 BBY) as a weakened Jedi Order and Republican Senate has difficulty controlling the outer fringes of the Republic as well as internal power-plays by worlds and corporations. Violence, trade disputes, political deadlocks all follow. Later in the period, the Jedi are increasingly discredited through a propaganda campaign orchestrated by Supreme Chancellor Palpatine. The order starts to fall apart, with fewer recruits, fewer resources, increasing “disappearances” and other losses to its membership. It is, however, still a force to be reckoned with.
17 BE – Anakin Skywalker first approached by Palpatine and given hints as to where teachings on the dark path to greater power could be found.

16 BE – Han Solo born on Corellia.

0 BE – Skywalker twins are born after Queen Amidala is spirited away from Anakin Skywalker by Obi Wan Kenobi and those loyal to the Old Republic. Amidala is hidden within the Royal Household of Alderaan, in Bail Organa’s family’s service as a nursemaid and servant (tutor). The daughter is kept as Bail Organa’s “daughter”, the son is taken by Kenobi back to Tattoine to be raised by Owen and Beru Lars; Owen Lars is a cousin of Anakin Skywalker. Kenobi stays nearby to protect the son, but Lars’ isolation as a farmer works well. Anakin was only vaguely aware his wife was pregnant, as he was busy serving Senator Palpatine and saw her only rarely. She had also concealed she was pregnant with twins.
0 BE – Anakin Skywalker finishes his fall, becomes Darth Vader after he and Obi Wan Kenobi battle at Mustafar and he is thrown into the lava pits. The massive damage he sustains leaves him dependent on his protective armor and life-support, and limits his powers in the Force.
0 BE – Empire declared, with Palpatine becoming Emperor, now year 1 of the New Order (NO). Emperor makes Darth Vader the Dark Lord of the Sith, his special agent to deal with the Jedi and ensure the security of the state. Palpatine renames the Senate as the Imperial Senate, with limited power and controls.

1 - 10 NO – The Jedi Purge, orchestrated by Emperor Palpatine, conducted by Vader and Imperial forces under his control.
1 NO – Queen Amidala, living under the name Padme, dies on Alderaan.

2 NO – Stormtroopers, using armor based on those of the clones during the Clone Wars, appear as the new standard line unit in the Empire.
2 NO – Eye of Palpatine station begun, later destroyed.

7 NO – Ghorman massacre, Captain Tarkin promoted to Moff as a result.

11 NO – Darth Vader finally has time to search for his lost child (not realizing there were twins), finds no trace and dismisses the search.
11 NO – Death Star design work begins, Grand Moff Tarkin in command.

16 NO – ISD design finalized, orders begun.
16 NO – Death Star design finalized, completed prototype components joined, construction of remaining sections begun.

17/6 NO – Corellian Treaty signed, Rebel Alliance is formed, first HQ is on Chrellis.
17/6 NO – Mon Calamari ships ordered to be constructed in secret for the rebels.
17/8 NO – X-Wing plans stolen by fleeing design engineers, turned over to rebels.
17/9 NO – Construction of first SSD’s begun.

18/4 – Rebel HQ moves to Orion IV, then begins moving every 6 weeks or so, until it ends up on Dantooine.
18/6 NO – First ISD’s received and operational by the Imperial Navy.
18/7 NO – First X-Wing fighters completed by rebels.
18/10 NO – Death Star plans stolen.
18/12 NO – Death Star plans uploaded to consular ship Tantive IV by rebel spies.

19/1 NO – Princess Leia and Tantive IV captured by Darth Vader; he reports it destroyed with all hands lost.

Still Here

Have a longer, themed post to do next, but wanted to actually talk about miniatures before I put it up. The last month has been busy with work, weekends away and women. Well, one. So there was a pause, but some figure prepping was done (despite being against my resolutions for 2011) and the last two nights saw some actual painting done. The 2mm Star Wars stuff was painted to a point where I could safely pause, and then I got onto a priority - practicing my 25/28mm painting so I'll be in shape to do some Xmas gifts.

I am also working to cross everything off a list I prepared of all the half-started or nearly finished projects lying around. I want to get them done before anything new begins...

Wednesday, October 26, 2011

A Tale of Two Parcels

So back in early September I sent in a large-ish order to Irregular, mainly for some 6mm fantasy armies, assorted 6mm extras, and 2mm terrain. It was large-ish enough that even with international surface shipping (20%) I was paying $50 shipping or so.

Normally it's about a 3 week turnaround to mail in the order and get it from Irregular, but this was a large order and it was surface shipping, so I didn't fret as mid-October rolled around.

Then last Wednesday (19th) I get a parcel from Irregular with the interesting additional label supplied by somebody (Royal Post) I presume, reading "Mis-sent to Australia". Australia!?! The label rather clearly says "Canada", how'd anyone miss by two continents?

Upon opening the package, I see a note from Ian that my order was coming in two parcels. So, hmmm, this one went from the UK to Australia back to the UK then to Canada, and it's here first? The shipping stamp said it was sent Sept. 19th, so it spent on a month on its world travels, but now I'm worried about the other half of the order.

Did it go to Australia too? Did it go even further? Antarctica? Mars? Or did it just get an everyday sort of lost?

I was going to give it a few more days, probably till the end of this week, before I checked in with Irregular. Then this morning I check the front door before work, as parcels often arrive before 9, and nothing's in between the doors. I open the outer door, as sometimes in their infinite wisdom the mailmen leave the parcel sitting in the open on the porch, but there's nothing there.

Then I notice my blue recycling bin is sitting about a foot away from the wall, and somethings behind it. Lo and behold it's Parcel #2. But I just had the blue bin out Monday night for recycling, putting it back on the porch last night (Tuesday) after getting back home from work, and I swear nothing was there then. So it must have been delivered this morning and the mailman decided to really mess with me and hid it behind the blue bin.

I don't think there's a moral here, though I am happy to have my package. But 5 weeks to get here and the mailman has to hide it on me? As the kids say, "What up with that?"

Monday, September 26, 2011

2mm Star Wars Works in Progress

I've shown off some pictures before of my 2mm Star Wars project as I've been working on painting the bases. I'm still working on the green bases (for temperate worlds), and a few test runs of the snow bases, and to keep my enthusiasm up, I've dabbled with painting some of the figures themselves, "as pilot projects" mind you.

Here are some of the works in progress. The bases aren't finished, and I'm not entirely happy with the texture of some of them, but like I said, I needed a break from two weeks of painting one shade of green and one shade of white!

The Rebels at least have the sense to camouflage their speeders on temperate worlds. I still have to do the detailing - cockpit, blasters, engines, but the camo's done, just a simple two-greens scheme.

The Stormtroopers of course just challenge you to shoot them, in the "we're so dangerous we make it easy to see us, fool" school of camouflage (c.f. Cylons). Besides tidying up the bases, I need to add a simple black line to show where the rifles are. It's actually easier to see where the rifles are supposed to be after the wash (black) and drybrush (white); before I couldn't even figure out where the front of the base was.


Gaming distance shot:
The AT-ST's also don't believe in camo. I've painted these a lighter shade of gray than the snow AT-AT's and AT-ST's, as you'll see below. I thought it contrasted better. Still need to detail these:
And the snow walkers:The base coat needs another application, then I can get into detailing and drybrushing.

I think I'm almost out of the green phase other than touch-ups, just a bunch more of the Hoth units and then I can paint the figures en masse (unless I get distracted...).

Monday, September 19, 2011

Battle of Novi Photos

This past weekend was the "Big Game" weekend at the 6mm Napoleonics (and FIW, AWI, 1812) club I play in. Both days were separate re-fights of the Battle of Novi in 1799, using modified Polemos rules that are slated for eventual production. I was only there on the Sunday, assuming the role of the heroic, if slightly tardy, Russian commander Derfelden. There were two other Allied commanders, one playing Kray, the other Suvorov/Melas (a fourth commander didn't make it). Against us were a lot of Frenchmen on a hill under four commanders.

I only remembered to take photos prior to game play, and towards the last few turns, so this is a potted, Russo-centric history of the battle, which ended a minor Allied victory. I've annotated some of the photos, I suspect the French will disagree with some of them... You can click on the photos for larger versions with more readable annotations.

Here's the big view, with the initial Austrian forces off-screen to the bottom left:

However, here are those Austrians:
They bore the brunt of the fighting for much of the game. As they'd gained some initial successes, the overall commander continued to feed them Tempo Points (initiative), even when my veteran soldiers with plodding commanders finally started to arrive:There was a gap between some of the French forces to start, but they used the lull before the Russians arrived to pull forces from their right to try to fill it. My initial orders included the command to get my Cossacks up into the gap to raise a little hell (but not actually fight anyone if possible). As it turned out, the gap wasn't so gap-py by the time I got there.

Straight up ahead of my units was the town of Novi, to the left before the hill/terraces was the start of the rather extensive vineyard (portrayed by trees,but really vines) seen above.The vineyard was rough ground for movement, but didn't prevent the French from cannonading my troops whenever possible.

In the meanwhile, with some inspiration from Bagration, my heroic Cossacks got into onto the hill, only to promptly be surrounded on three sides by French cavalry, and attacked on two of those sides.

However, like the drunken smelly buggars they are, my Cossacks threw back both attacks, escaped the trap, and went and hung out in the vineyard for the rest of the game, occasionally getting cannonballs in their direction. I like to think the French commanders were briefly traumatized by the affair.

Eventually the rest of the Austrians started to show up on our left, but things were winding down by then. The French had a battery facing them down the road, but just as things ended it ran into some supply problems and was vulnerable.

So here's how far my troops got. You can see they occupied one arm of the vineyard and were working towards popping a hole in the French line where they didn't have any ready artillery support. I actually had a second French battalion driven back by the time the game ended. Not enought to do anything yet, but with some Tempo Points over the next few turns I like to think I could have widened it further.
However, our victory was mainly because of what was happened on the right, which was a real bloodbath but with more French blood than Austrian. I've drawn a line showing roughly how much of the plateau was Austrian by the end, but things were still heated up there.
And to show you how much blood was spilt, here's the French dead pile:Curiously, the Allied illustrators forgot to portray the Austrian dead pile.

For more information on the club, here's the website (it's a bit dated, but you can contact Glenn through it).

Wednesday, September 14, 2011

B is for Beer

A few years ago I started coming across cool individual WWII plane identification references for the RAF like "B is for Beer" and "R is for Robert", although I'm sure I've come across them before, but never consciously noticed them ("beer" probably got my attention this time). Early attempts to find the complete list failed, but recently I found the entire 1942-43 RAF phonetic alphabet online, so here it is:

A Apple
B Beer
C Charlie
D Dog
E Edward
F Freddy
G George
H Harry
I In
J Johnny (Jug)
K King
L Love
M Mother
N Nuts
O Orange
P Peter
Q Queen
R Robert (Roger)
S Sugar
T Tommy
U Uncle
V Vic
W William
X X-Ray
Y Yoke (Yorker)
Z Zebra

Land forces at the time were using the Abel, Baker, Charlie etc. system, replaced in 1956 by the modern NATO system of Alpha, Bravo, Charlie etc. (ain't the internet wonderful).

So now when I add ID codes in decal to my British and Canadian planes, I'll make sure I know how to translate them.

Friday, September 9, 2011

On the Table(s)

Right now projects are spread out over three different tables, and I'm trying to clear off at least two of them to get my efforts in synch, rather than the usual "start something, get distracted, leave it on the table for four months".

All photos can be enlarged by clicking on them, as usual.

Of course, yesterday my Brigade Models UK parcel arrived after their Land Ironclads and Aeronef sale, so I promptly used some of the new big textured bases I got to mount some of my 2mm alien army:Some are purchased shells from the dollar store (have a bunch more for terrain) while the various snails are from a local beach. I've turned the bigger snails 90 degrees so they have an obvious front.

I'm not sure what these aliens will be in my VSF world, they don't really fit into my Wells+Space 1889 visions of Mars and Venus. Maybe from outside the solar system, maybe the wildlife of Mars, maybe Martian bio-units. I'm going to try painting a hole underneath some of the snails so they'll look like they're worms emerging from the ground.

I've finally gotten some progress on various wooden birdhouses and Creatology puzzle that I'm converting for various uses. The two on the left will be Tudor-esque, the one of the right more of a North American wooden construction. Two got fancy roofs, the leftmost will just be painted up.


Some 2mm forts and castles. Front and back are for India, in the middle is a Vauban fort for 18th century Europe.
Star Wars + 18th Century India here!To the left are some Indian units I'm painting up the bases for. Snowspeeders are in the background. The AT-AT's (and one AT-ST) are for Hoth, so I'm trying for an ice planet paint job by going white, then blue wash, then white wetbrush. I've gotten through two out of three...

More Star Wars 2mm in progress. These are the green world forces (sand world and ice world are the other two) for both Rebels and Imperials. You can also see in the background a Roland two-seater I'm working on for WWI.

Wednesday, August 24, 2011

Decal Day

I know things may seem a bit crazy, what with two blog posts in one day, but last night I got caught up* on decalling (or is it decaling?), and here are the results:
The Halberstadt CL.IV is from CinC, the other two are Goblintooth's.

Close-ups of some:

My patrol boats for Vietnam got their stars:

And some of my 25mm foot knights got aligned (kind of randomly, I liked the decals):
* I didn't do any Vietnam helicopter decals, as I realized I don't have the low-viz decals some helicopters need, and nobody makes "UNITED STATES ARMY" decals in 1/600. I've put in an ask to Dom's Decals, hopefully they can be made, otherwise I'll have to just go ahead and pretend they're there. They were pretty low-viz anyway (black on olive drab), so maybe no one will notice, specially once the rotors are in place.