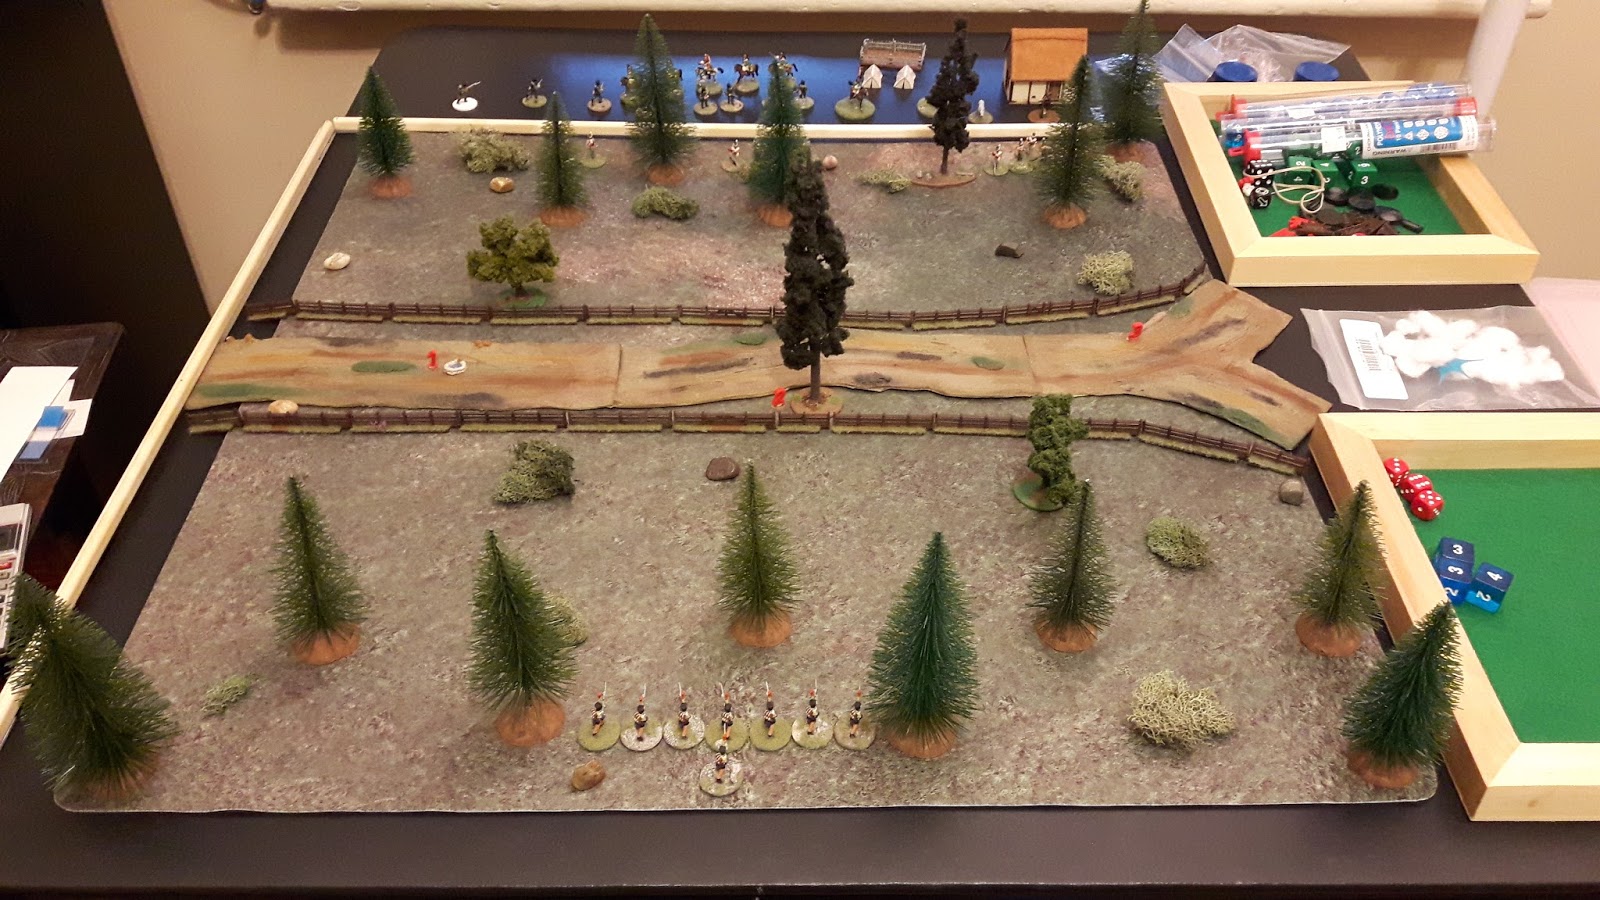
In a week and a half I'm running a four-player game of Gamesha Games' Song of Drums and Shakos in Hamilton (Ontario) for Broadsword 4, the local one-day game con. I'm going to try out a new scenario, based in Spain still, that at least pulls in a bit of the con's theme for this go-round: celebrating H.P. Lovecraft's birthday with Cthulhu-themed games/scenarios. I'm not bringing the Mythos into the game, but it's set in an isolated, supposedly haunted, part of Spain, and you might recognize a few names in the scenario description:
"Out of La Marisma - Spain, July 1813. Deep in the Irati Forest of the Pyrenees Mountains, near the Roncesvalle Pass, Lieutenant Lovecraft of the Rifles and Sergeant Reilly of the Light Dragoons have been keeping a piquet astride some swampy, well-nigh impassable, trails. However, the trails were less impassable than the British believed, and after days of scouting Captain Dagon of the Carabiniers and Lieutenant Tindalos of the Hussars now lead their French forces out of the morning mist to do an end run on the British defences in Spain. Each player will control 8-15 figures in a short, sharp cinematic skirmish."
This has necessitated (and thus got me to do something) some new terrain pieces, including a stone bridge, some gravestones, and a Spanish windmill (not pictured):
All still need some/lots work still. The bridge (old JR Miniatures) needs the side stones and gravel to be drybrushed, and then some touch-ups before a white wash is used to wear down the red stones further. The gravestones and roadside cross (Hovels) are just primed so far.
Showing posts with label Scenics/Terrain. Show all posts
Wednesday, August 16, 2017
Wednesday, May 31, 2017
Empires at War 15mm Buildings
Recently these Empires at War 15mm timber-framed ECW-ish buildings came to my attention, so I ordered the three available thinking they were DIY kits, like most mdf buildings are. Imagine my surprise to find out that EAW assembles them for you!
They came super-quick from the UK, and thanks to Mick at EAW asking at the post office about economy postage, super cheaply for shipping.
I did have to use a bit of brush-on matte varnish to take away the shine of some glue stains, and I also used brown and black markers to cover up some spots where the originally tan-ish mdf shows through (most mdf kits have this issue, and I usually do the same thing to them too). But otherwise they're great, and I've talked to Mick about some colour variation in the roof and/or chimney location, so I can get a few more to serve as part of my urban table for ECW skirmish gaming with Song of Drums and Shakos (my self-titled Song of Pikes and Matches variant).
So the short version is "very recommended!".
Friday, September 30, 2016
Song of Drums and Shakos Boards
I showed one of these off last week, but here's the full set of six boards I had ready Song of Drums and Shakos scenarios at KEGSCon last week (I'll report on that in my next post). I had three basic mats - snow, grass, urban - and two scenarios set for each.
As it turns out, we only got two of the tables (Cannons and Maps) into action, but I'll talk about why that was probably a good thing in my next post. But I'm now all set up for lots of SDS gaming, with these maps/scenarios and more in development. A pile of terrain was finished in the last two months once I had the hard target of KEGSCon to work towards.
Stop Shooting Those Cannons At Me!
The Last Pig in Russia
Find the Maps
Troubles With The Ladies Of Spain
Take The Streets
Klepakhov's Heroes
As it turns out, we only got two of the tables (Cannons and Maps) into action, but I'll talk about why that was probably a good thing in my next post. But I'm now all set up for lots of SDS gaming, with these maps/scenarios and more in development. A pile of terrain was finished in the last two months once I had the hard target of KEGSCon to work towards.
Monday, February 22, 2016
First We Take Manhattan
I previewed one piece of this in last week's post, so today I have some more of my Manhattan Island project for giant monster gaming with Mighty Monsters and 3" gashapon figures. I've picked most of these up in the last few months, the Manhattan-specific stuff from eBay and the other landmarks at a dollar store in the toy section.
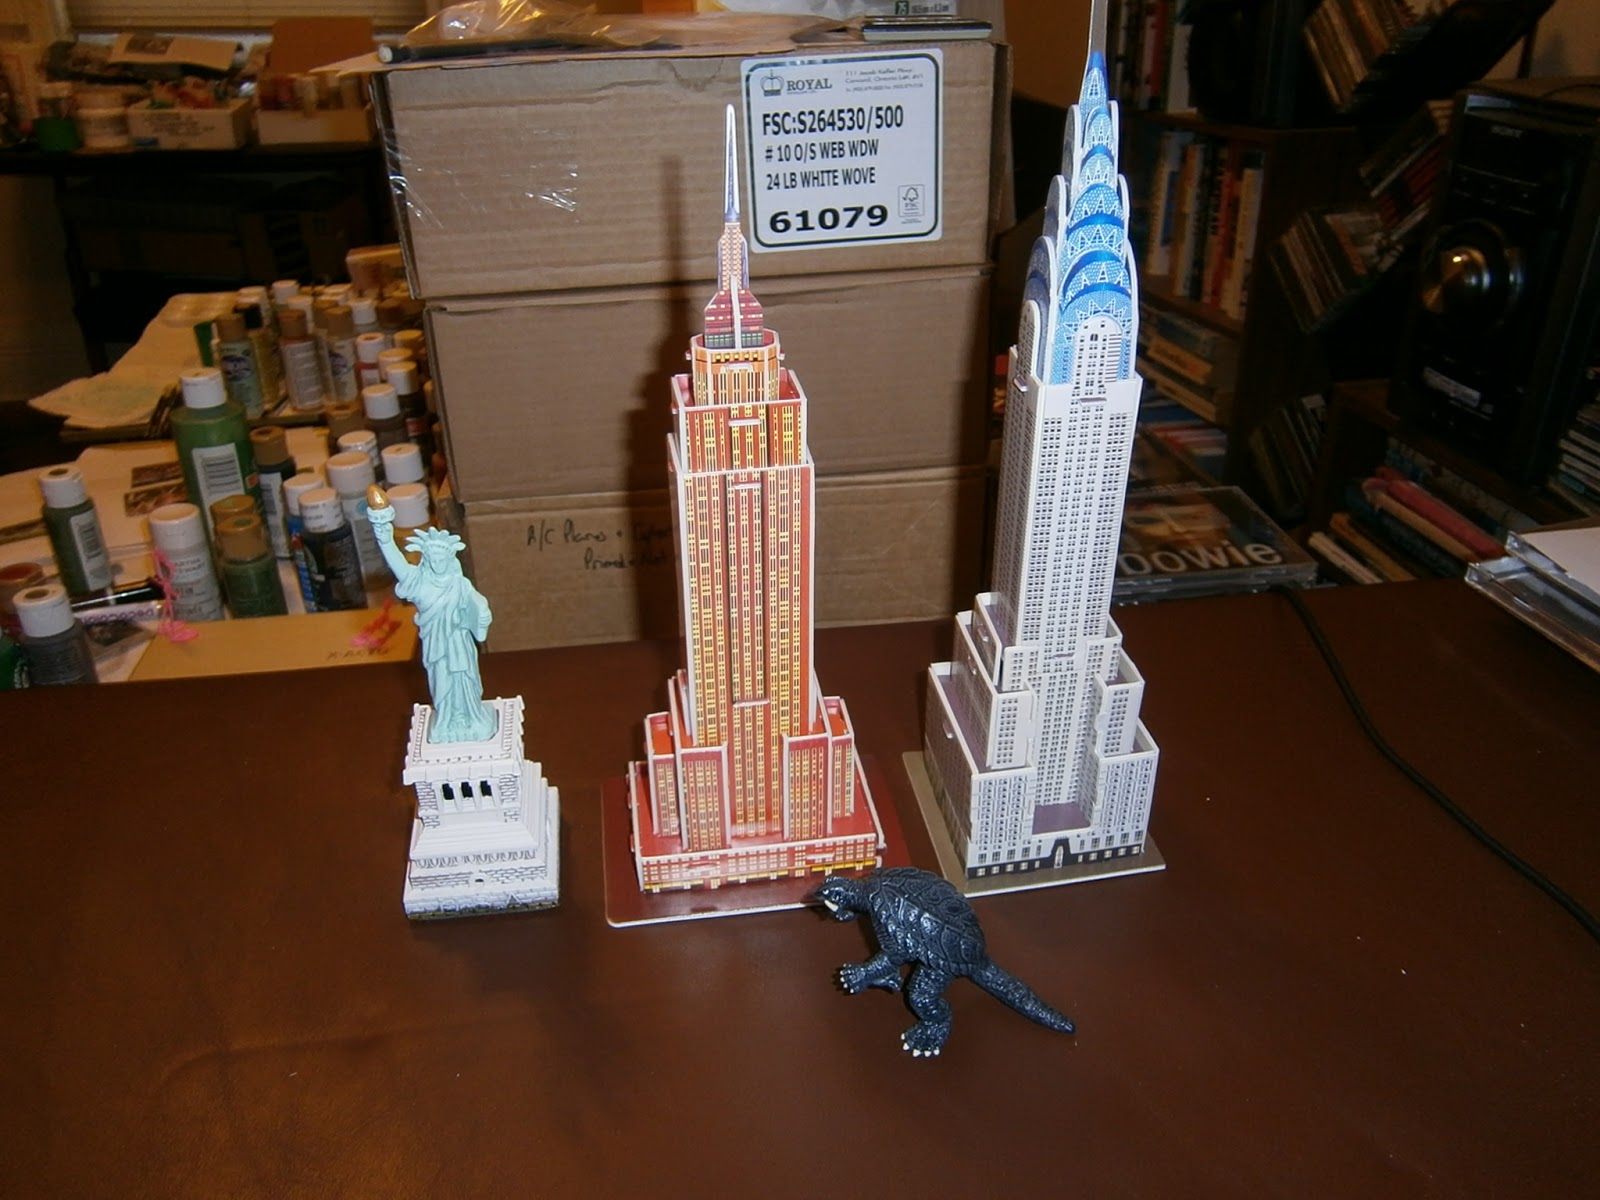
When you think of monsters in New York, the Empire State Building is of course #1, so that was my first goal, and a 3D puzzle from China solved that. From the same source I also got a Chrysler Building 3D puzzle, but now face the slight problem that the Chrysler Building is taller than the ESB! So I'm going to have to make sure I separate the two a bit when I put Manhattan Island together, making sure the ESB is more front-stage.
I didn't want to involve the World Trade Centre buildings with any gaming, so I'm going with a pre-1970 New York, leaving the next landmark in my mind as the Statue of Liberty. There was another Chinese seller with a perfectly scaled (for 1/600) fake brass statuette on eBay, the entire thing being about 6" high (the real Statue and base is about 300'). Both the ESB and Chrysler Building are somewhere around 1/2000 or 1/2400, but still way taller than my paper city buildings from Germy and cut-down 6mm files.
With that pre-amble, here they are, with Gamera helping by providing a reference size:
I discovered a bit of an issue with the ESB when I pulled it out for this photo shoot - some of the paper is peeling away from the foam on the base and it's developed a bit of a warp, but some Aileen's Tacky Glue solved the former, and some coffee stir sticks glued under the base solved the latter. The base for both is about 1-2mm in the air because tabs are projecting through, but most of my buildings are going onto tiles that will be the sidewalks, so I'll fill in the resulting gap when I get the buildings glued to the tiles.
As I mentioned above, the Statue of Liberty is a fake-brass thingy, so I had to paint it up, coating it first with white gesso. I'm also going to have to build a proper fort-like base for it, around the lowest (and unpainted in the photos above) level, so the arched doors open onto the roof of that base. But that's for another day (I haven't really thought that through yet).
But here are some pics of the SoL as a work-in-progress:
On the top is the original statuette, out of the box, and below is after the gesso and gesso+brown paint was added.
Close up of the final product (barring the base):
A couple of other 3D puzzles I picked up in early January in a dollar store are a near-1/600 scale Notre Dame cathedral and a 1/1000 or so St. Peter's Basilica. They don't work right beside each other, and Notre Dame doesn't work right beside the ESB and Chrysler Buildings, but with several blocks of other buildings between them, I think they'll do ok. Most of the buildings from Germy helpfully lack real scale benchmarks, so if you look at Notre Dame and then scan over to the ESB, you will hopefully sort of ignore the difference.
I figure Notre Dame will fill in for one of the big NY cathedrals, St. Patrick's or St. John the Unfinished (which would actually be off-map - see below), the height is right for one and the footprint for the other. St. Peter's could do double duty as a fancy European state building, university campus, or palace. You can build it without the keyhole-shaped forecourt too, which will make it an alternate church too by disguising its origins somewhat. It was a pain to put together (lots of swearing) but looks ok for what it is now.
To wrap up the pictorial portion of this entry, here's a WIP shot of the tiles that will base my monster city buildings. These are test subjects, of a few tile types and how they take cheaper Bob Ross grey gesso (I save the Liquidtex grey gesso - impossible to find here now - for figures). I found the cheap dollar store tiles actually seem to be best. They aren't super solid support for the buildings (they're a bit bendy) but to date THEY DON'T WARP! The thicker stuff (a couple pieces pictured here) warps a little and is really thick; I have some mid-thickness stuff from Home Depot that cost more than the dollar store stuff and it warps. I have some pending 3mm rice paddy shapes in this Home Depot stuff cut out that have been under about 100lbs of pressure for a couple of years and they still want to warp whenever I let them come out for air (and I haven't painted or based them at all, just cut them out!).
Anyway, the cheapest stuff seems to work. These are 4" square bases, except for the unpainted 4x8" piece of the thickest stuff.
More to come on these, I still have lots of buildings to cut out and build yet (and more to print). Most tiles will be 4x4, some will be 4x3, others 4x5 or 6, and yet others will be custom sizes for the type of city block I'm building. Central Park will probably be 8x8", representing only a portion of the park at the edge of my Manhattan.
Which leads me to what I'm trying to do with Manhattan map - it's going to be a fairly (fairly = highly) stylized representation of the island and part of the river, probably a total of about 7.5' long by 3' wide. I may make it a bit wider or longer by showing more river, but at its thickest the island will be 3' wide. So at one end I'll have 18" (maybe 36") of open water, representing the SW approach to the island, with the Statue of Liberty Island at one edge, and Governors and Ellis Islands making appearances.
Then there will be a 18x36" strip of water (representing the Hudson River to the west of the island) and an 18x36" strip of city - the financial district more or less, up to Chelsea. Lower east side won't be mapped, the Brooklyn Bridge will be partially on the table (using a generic bridge from Shapeways that I'm working on).
Then there'll be a 36x36" section of city, Chelsea to say 1/3 of Central Park - call East 72nd Street the edge of the set-up.
So I hope that'll give me some water for approaching monsters to use before they get to the city, and lots of colour for the eventual fight in the city. It all looks beautiful in my head.
I also have a 25" (!) Tokyo Tower 3D puzzle to put together, and in the mail is a double feature CN Tower + Skydome (aka Rogers Centre), so my kaiju are going to be able to threaten Tokyo (of course) and Toronto as well as Manhattan and assorted generic cities.
But I ain't building Berlin.
When you think of monsters in New York, the Empire State Building is of course #1, so that was my first goal, and a 3D puzzle from China solved that. From the same source I also got a Chrysler Building 3D puzzle, but now face the slight problem that the Chrysler Building is taller than the ESB! So I'm going to have to make sure I separate the two a bit when I put Manhattan Island together, making sure the ESB is more front-stage.
I didn't want to involve the World Trade Centre buildings with any gaming, so I'm going with a pre-1970 New York, leaving the next landmark in my mind as the Statue of Liberty. There was another Chinese seller with a perfectly scaled (for 1/600) fake brass statuette on eBay, the entire thing being about 6" high (the real Statue and base is about 300'). Both the ESB and Chrysler Building are somewhere around 1/2000 or 1/2400, but still way taller than my paper city buildings from Germy and cut-down 6mm files.
With that pre-amble, here they are, with Gamera helping by providing a reference size:
The view from the ground:
Some individual shots of the 3D puzzles:I discovered a bit of an issue with the ESB when I pulled it out for this photo shoot - some of the paper is peeling away from the foam on the base and it's developed a bit of a warp, but some Aileen's Tacky Glue solved the former, and some coffee stir sticks glued under the base solved the latter. The base for both is about 1-2mm in the air because tabs are projecting through, but most of my buildings are going onto tiles that will be the sidewalks, so I'll fill in the resulting gap when I get the buildings glued to the tiles.
As I mentioned above, the Statue of Liberty is a fake-brass thingy, so I had to paint it up, coating it first with white gesso. I'm also going to have to build a proper fort-like base for it, around the lowest (and unpainted in the photos above) level, so the arched doors open onto the roof of that base. But that's for another day (I haven't really thought that through yet).
But here are some pics of the SoL as a work-in-progress:
On the top is the original statuette, out of the box, and below is after the gesso and gesso+brown paint was added.
Close up of the final product (barring the base):
A couple of other 3D puzzles I picked up in early January in a dollar store are a near-1/600 scale Notre Dame cathedral and a 1/1000 or so St. Peter's Basilica. They don't work right beside each other, and Notre Dame doesn't work right beside the ESB and Chrysler Buildings, but with several blocks of other buildings between them, I think they'll do ok. Most of the buildings from Germy helpfully lack real scale benchmarks, so if you look at Notre Dame and then scan over to the ESB, you will hopefully sort of ignore the difference.
I figure Notre Dame will fill in for one of the big NY cathedrals, St. Patrick's or St. John the Unfinished (which would actually be off-map - see below), the height is right for one and the footprint for the other. St. Peter's could do double duty as a fancy European state building, university campus, or palace. You can build it without the keyhole-shaped forecourt too, which will make it an alternate church too by disguising its origins somewhat. It was a pain to put together (lots of swearing) but looks ok for what it is now.
To wrap up the pictorial portion of this entry, here's a WIP shot of the tiles that will base my monster city buildings. These are test subjects, of a few tile types and how they take cheaper Bob Ross grey gesso (I save the Liquidtex grey gesso - impossible to find here now - for figures). I found the cheap dollar store tiles actually seem to be best. They aren't super solid support for the buildings (they're a bit bendy) but to date THEY DON'T WARP! The thicker stuff (a couple pieces pictured here) warps a little and is really thick; I have some mid-thickness stuff from Home Depot that cost more than the dollar store stuff and it warps. I have some pending 3mm rice paddy shapes in this Home Depot stuff cut out that have been under about 100lbs of pressure for a couple of years and they still want to warp whenever I let them come out for air (and I haven't painted or based them at all, just cut them out!).
Anyway, the cheapest stuff seems to work. These are 4" square bases, except for the unpainted 4x8" piece of the thickest stuff.
More to come on these, I still have lots of buildings to cut out and build yet (and more to print). Most tiles will be 4x4, some will be 4x3, others 4x5 or 6, and yet others will be custom sizes for the type of city block I'm building. Central Park will probably be 8x8", representing only a portion of the park at the edge of my Manhattan.
Which leads me to what I'm trying to do with Manhattan map - it's going to be a fairly (fairly = highly) stylized representation of the island and part of the river, probably a total of about 7.5' long by 3' wide. I may make it a bit wider or longer by showing more river, but at its thickest the island will be 3' wide. So at one end I'll have 18" (maybe 36") of open water, representing the SW approach to the island, with the Statue of Liberty Island at one edge, and Governors and Ellis Islands making appearances.
Then there will be a 18x36" strip of water (representing the Hudson River to the west of the island) and an 18x36" strip of city - the financial district more or less, up to Chelsea. Lower east side won't be mapped, the Brooklyn Bridge will be partially on the table (using a generic bridge from Shapeways that I'm working on).
Then there'll be a 36x36" section of city, Chelsea to say 1/3 of Central Park - call East 72nd Street the edge of the set-up.
So I hope that'll give me some water for approaching monsters to use before they get to the city, and lots of colour for the eventual fight in the city. It all looks beautiful in my head.
I also have a 25" (!) Tokyo Tower 3D puzzle to put together, and in the mail is a double feature CN Tower + Skydome (aka Rogers Centre), so my kaiju are going to be able to threaten Tokyo (of course) and Toronto as well as Manhattan and assorted generic cities.
But I ain't building Berlin.
Monday, February 23, 2015
Back With a Very Minor Bang
Well it's been a long, long time - not an unproductive time for my miniatures hobby, but between needing a new computer that worked better with BlogSpot and doing a lot of unphotogenic prep work, I haven't gotten anything up on here for almost a year, and even then my lone 2014 post was pretty lame.
I still have a bunch of photos from Hotlead 2014 to get up, and since Hotlead 2015 is almost here, I'd better get them up soon! And then I have some game photos from the 6mm Napoleonics club I'm in and some aircraft shots from Canada's Aviation Museum.
On the topic of Hotlead however, I'm hoping to host my first ever game there, actually a series of short scenarios within one timeslot. The rules are "Songs of Drums and Shakos" by Ganesha Games, and they're very small scale (8-15 guys per side) cinematic Napoleonic skirmish rules. Sharpe or Brigadier Gerard types of things. I also plan on eventually using them for 18th and 19th century adventures in India and variants for the French and Indian Wars/War of 1812.
My first batch of 15mm Napoleonic figures have been painted up by my buddy Ron and I'm now in a panic getting everything else done. One thing I realized I needed are fences and other minor terrain bits for both Russia and the rest of Europe. So while I plan on buying 4Ground fences for NW/Central Europe, I wanted something more peasant-like for Russia (apologies to any Russians reading this), so I spent the weekend working on some tests.
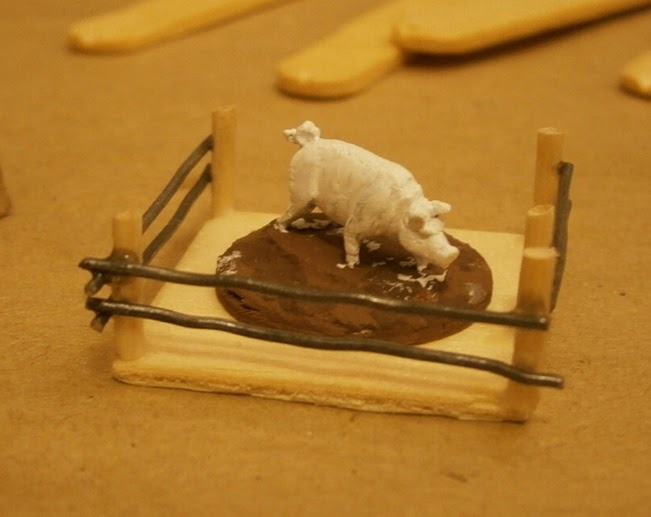
This is the collective shot with some figures for scale, on the left is a pig/chicken pen that will fit against a building wall (hence the open side to the left) and will also have smaller wire glued vertically to the crossbars to represent the smaller branches that actually keep the animals in. Google "old Russian village fences" and you'll see some examples of what I mean.
On the right are my attempt at regular Russian farm fences, the sort used to pen in cattle or maybe between fields. In retrospect they probably should have been a bit taller - I was aiming for 10mm high posts, or about 4'. But I think they'll do ok for now, I only need a few of them to start. Fences 2.0 can be taller.
Below is the pig pen again, the vertical wire (smaller branches) will be 28 gauge hobby wire. Some of these will be with a wintery look, others a summer/spring (basically, no snow) look. I'll also do some all busted up and others (like this) intact with an eventual gate. The busted winter ones will be for my "Last Pig in Russia" 1812 scenario.
That's all for now, good to be back!
I still have a bunch of photos from Hotlead 2014 to get up, and since Hotlead 2015 is almost here, I'd better get them up soon! And then I have some game photos from the 6mm Napoleonics club I'm in and some aircraft shots from Canada's Aviation Museum.
On the topic of Hotlead however, I'm hoping to host my first ever game there, actually a series of short scenarios within one timeslot. The rules are "Songs of Drums and Shakos" by Ganesha Games, and they're very small scale (8-15 guys per side) cinematic Napoleonic skirmish rules. Sharpe or Brigadier Gerard types of things. I also plan on eventually using them for 18th and 19th century adventures in India and variants for the French and Indian Wars/War of 1812.
My first batch of 15mm Napoleonic figures have been painted up by my buddy Ron and I'm now in a panic getting everything else done. One thing I realized I needed are fences and other minor terrain bits for both Russia and the rest of Europe. So while I plan on buying 4Ground fences for NW/Central Europe, I wanted something more peasant-like for Russia (apologies to any Russians reading this), so I spent the weekend working on some tests.
This is the collective shot with some figures for scale, on the left is a pig/chicken pen that will fit against a building wall (hence the open side to the left) and will also have smaller wire glued vertically to the crossbars to represent the smaller branches that actually keep the animals in. Google "old Russian village fences" and you'll see some examples of what I mean.
On the right are my attempt at regular Russian farm fences, the sort used to pen in cattle or maybe between fields. In retrospect they probably should have been a bit taller - I was aiming for 10mm high posts, or about 4'. But I think they'll do ok for now, I only need a few of them to start. Fences 2.0 can be taller.
Below is a ground-scale view of the fences, a gate will eventually go in the gap, then I'll add some texture to the base and get painting! All told these involved popsicle sticks, thin (Touch brand) toothpicks, white glue, and 20 gauge hobby wire.
Below is the pig pen again, the vertical wire (smaller branches) will be 28 gauge hobby wire. Some of these will be with a wintery look, others a summer/spring (basically, no snow) look. I'll also do some all busted up and others (like this) intact with an eventual gate. The busted winter ones will be for my "Last Pig in Russia" 1812 scenario.
That's all for now, good to be back!
Friday, July 26, 2013
Finished Tanks & Ruined Factory
Well, by "finished" of course I mean they need a coat of Dullcote to really finish them off, and the tanks need a coat of Future Floor Polish over their decals to seal them, but "artistically", these are all done! Yay me!
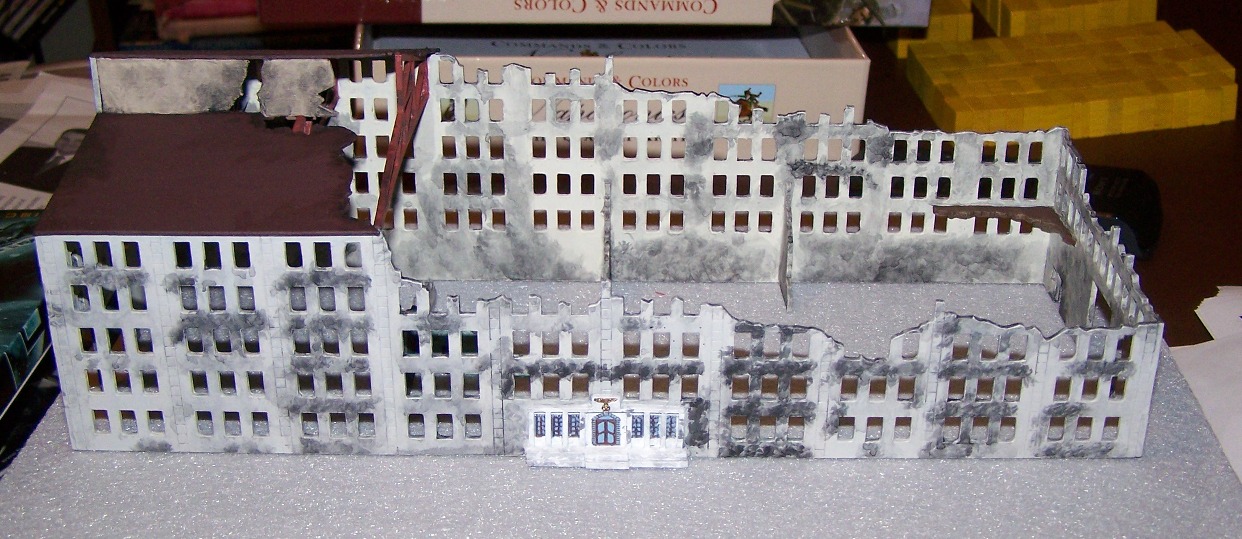
First up is the 6mm ruined factory from Gamecraft Miniatures, with a roof added on by me, as well as doors and ruined walls made from Gamecraft's ruined floors. This is the front, complete with Nazi eagle. The front pillars etc. were painted as being fancier than the basic walls, and show up a big grubbier looking in real life, the white reflected the flashbulb well in this pic:
The temperature and humidity around here finally broke this week, after 3 weeks of high temps and humidity that meant I didn't really want to do any critical painting or decalling. But with this window of opportunity, I finally decalled up some tanks that have taken way too long to finish.
This is the whole collection, although the American halftracks and armored cars still need final detailing before they get their decals (I also have to figure out where the decals go on them!).
British Comets to the centre and left, one of those American halftracks on the right:
ISU-152 up close:
More ISU-152s!
On the left a couple of T-34/85s, I did a pack of 5 (all of these are GHQ), 3 in one platoon, 2 in the other. The T-34/85 up front is obviously a hero of the Soviet Union with all those kills on the barrel! Decals here are a mix of GHQ and I-94.
The other platoon (2 tank platoon) of T-34/85s.
My fleet of JS-3s! These heavy tanks were in platoons of 2, so my five-pack gave me 2 platoons and a HQ tank. The red numbering and star didn't show up as well as I'd hoped, but within historical reality.
As always, clicking on the photos brings up bigger views of them, although these small scales aren't necessarily prettier the closer you get!
First up is the 6mm ruined factory from Gamecraft Miniatures, with a roof added on by me, as well as doors and ruined walls made from Gamecraft's ruined floors. This is the front, complete with Nazi eagle. The front pillars etc. were painted as being fancier than the basic walls, and show up a big grubbier looking in real life, the white reflected the flashbulb well in this pic:
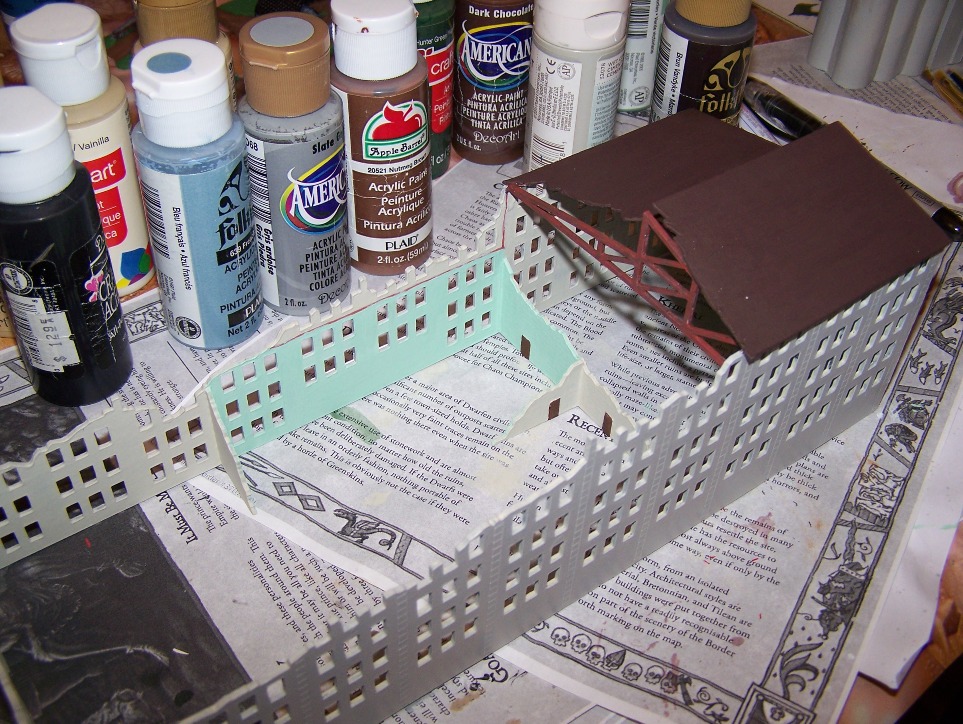
Here's an interior shot, the office area is where the turquoise walls are, the rest was factory:
Another view of the interior, showing the one problem area I had, what to do with the reverse side of that fancy entranceway. It was either try to paint by hand the windows and door, or...
Build a pile of rubble to put in front of the blank wall to cover up that it doesn't match the exterior. This is what I came up with, a wooden base with some cork bits, tin foil paper, a pin or two, and the sprue from a set of Shapeways aircraft I'd recently prepped. I also used some cardstock as roof/upper floor pieces.
A close-up of it. I'd built it so one side, that would go up against the wall, was supposed to be tall and cover up the blankness, but as you'll see in the next pic, somehow I misjudged the height and it's still short. Not sure what I'll do, either make another or keep adding to this. I do like the bits.
The rubble in place - as you can see, the wall isn't really covered at all.
The temperature and humidity around here finally broke this week, after 3 weeks of high temps and humidity that meant I didn't really want to do any critical painting or decalling. But with this window of opportunity, I finally decalled up some tanks that have taken way too long to finish.
This is the whole collection, although the American halftracks and armored cars still need final detailing before they get their decals (I also have to figure out where the decals go on them!).
British Comets to the centre and left, one of those American halftracks on the right:
ISU-152 up close:
More ISU-152s!
On the left a couple of T-34/85s, I did a pack of 5 (all of these are GHQ), 3 in one platoon, 2 in the other. The T-34/85 up front is obviously a hero of the Soviet Union with all those kills on the barrel! Decals here are a mix of GHQ and I-94.
The other platoon (2 tank platoon) of T-34/85s.
My fleet of JS-3s! These heavy tanks were in platoons of 2, so my five-pack gave me 2 platoons and a HQ tank. The red numbering and star didn't show up as well as I'd hoped, but within historical reality.
Another view of the JS-3s.
Monday, July 22, 2013
3 & 6mm Paintjobs in Progress
Hehehe, I said "paintjobs". Here are some of the things currently on painting table #2 now that the big German factory is finished (pictures to come). First up are some 3mm wood churches for Terrible Sharp Sword ACW gaming, the miniatures are from Bay Area Dockyards:
Most of the painting is don, now I'm in the touch-up cycle, correcting all my mistakes from the first pass! The pieces are ok, these ones didn't need any fixing, I have a lot of other Bay Area Dockyards that need sanding after I patched some pitting in the resin. Not tragic problems, but two extra steps in the process.
Next up is a 6mm bridge from what used to be Simply Six - I think Picoarmor carries the range in the US (at least he carries the 3mm stuff from Simply Six). This is actually DONE! Yes, believe it folks! It just needs sealing:
It's a really nice piece, none of the Simply Six stuff ever needed fixing, just a wash and straight to painting.
These 6mm ruins are also from Simply Six:
These are still a work in progress, I usually dabble with them when I paint left over from one of the other pieces, I add a bit to the rubble piles, and now just need to focus on finishing them with some grays and browns.
Finally, here's the Stalingrad Grain Elevators in 6mm from JR Miniatures:
The bulk of the painting is done, just have to do the gravel on the roof, drybrush the green and blue roofing, and do the metal tanks and pipes (and latticework on the one side).
Most of the painting is don, now I'm in the touch-up cycle, correcting all my mistakes from the first pass! The pieces are ok, these ones didn't need any fixing, I have a lot of other Bay Area Dockyards that need sanding after I patched some pitting in the resin. Not tragic problems, but two extra steps in the process.
Next up is a 6mm bridge from what used to be Simply Six - I think Picoarmor carries the range in the US (at least he carries the 3mm stuff from Simply Six). This is actually DONE! Yes, believe it folks! It just needs sealing:
It's a really nice piece, none of the Simply Six stuff ever needed fixing, just a wash and straight to painting.
These 6mm ruins are also from Simply Six:
These are still a work in progress, I usually dabble with them when I paint left over from one of the other pieces, I add a bit to the rubble piles, and now just need to focus on finishing them with some grays and browns.
Finally, here's the Stalingrad Grain Elevators in 6mm from JR Miniatures:
The bulk of the painting is done, just have to do the gravel on the roof, drybrush the green and blue roofing, and do the metal tanks and pipes (and latticework on the one side).
Friday, June 14, 2013
6mm German Factory Ruins WIP
This is a 6mm scenic project I've been working on for a while (too long - why am I so slow?), a ruined factory from Gamecraft, which came in acrylic plastic and had two optional ways to build it - as a German (eagle holding the globe symbol over the door) or Soviet (star symbol over the door) building.
It took a couple tries to find a good glue for the acrylic (Gorilla Super Glue won in the end), and I probably should have set the big doors at the back of the building, rather than the front, so they'd look like train doors that could have the track running through the whole factory. Although when I looked at the image on Gamecraft's site, they built it the same way.
The roof and interior floors and walls are all add-ons by me. The interior walls/floor are actually from Gamecraft's other ruined city sets, which come with ruined floors. I flipped some of them 90 degrees to make the walls. The roof bits are cut from heavy cardstock, out of the box it has exposed girders. I also used some thin cardstock for doors on the interior walls, and for exterior doors.
I'm getting to the end of the road for this, just some final touch-ups, finishing the external doors and windows at the main entrance, painting a gold eagle and globe, and then distressing the whole thing with soot stains.
I also have to deal with the interior side of the front entrance - because the fancy doors and windows on the outside are added on, the inside shows nothing to match them. My plan is to make a base of rubble heaped high enough to cover up the fact that there are no doors and windows along that part of the interior wall.
And if you're wondering about the turquoise - I wanted something with some contrast. I'm saying the turquoise is all the office space, and then I used a paint pen to add the outline of an interior wall and floor where it fell away; I'm hoping it looks better when distressed.
It took a couple tries to find a good glue for the acrylic (Gorilla Super Glue won in the end), and I probably should have set the big doors at the back of the building, rather than the front, so they'd look like train doors that could have the track running through the whole factory. Although when I looked at the image on Gamecraft's site, they built it the same way.
The roof and interior floors and walls are all add-ons by me. The interior walls/floor are actually from Gamecraft's other ruined city sets, which come with ruined floors. I flipped some of them 90 degrees to make the walls. The roof bits are cut from heavy cardstock, out of the box it has exposed girders. I also used some thin cardstock for doors on the interior walls, and for exterior doors.
I'm getting to the end of the road for this, just some final touch-ups, finishing the external doors and windows at the main entrance, painting a gold eagle and globe, and then distressing the whole thing with soot stains.
I also have to deal with the interior side of the front entrance - because the fancy doors and windows on the outside are added on, the inside shows nothing to match them. My plan is to make a base of rubble heaped high enough to cover up the fact that there are no doors and windows along that part of the interior wall.
And if you're wondering about the turquoise - I wanted something with some contrast. I'm saying the turquoise is all the office space, and then I used a paint pen to add the outline of an interior wall and floor where it fell away; I'm hoping it looks better when distressed.
Friday, October 5, 2012
6mm Scenic Frenzy
As you'll recall from my (now-retired) schedule for 2012, I was going to spend August on 6mm terrain and scenics, so here are some belated pictures from that effort. Most of these are still ongoing, and will probably linger on my table for the rest of the year. When I'm bored with prepping figures, I'll spend on time on these.
First up is a massive ruined factory from Gamecraft Miniatures. This is made of acrylic (thin plexiglass), but the roofs, doors, and interior walls and floors are scratchbuilt by me. The interior walls are actually ruined floors from Gamecraft's city ruins line, just turned on their side. I had some spares when I put together the city ruins (no photos of that project yet, it got packed away).
Some 6mm ACW figures for scale:
The kit gives you the option of putting the entrance together with a Soviet star or German swastika, and I went with the latter since my project plans call more for late war fighting at the moment.
First up is a massive ruined factory from Gamecraft Miniatures. This is made of acrylic (thin plexiglass), but the roofs, doors, and interior walls and floors are scratchbuilt by me. The interior walls are actually ruined floors from Gamecraft's city ruins line, just turned on their side. I had some spares when I put together the city ruins (no photos of that project yet, it got packed away).
Some 6mm ACW figures for scale:
The kit gives you the option of putting the entrance together with a Soviet star or German swastika, and I went with the latter since my project plans call more for late war fighting at the moment.
I also have been working on the sci-fi outpost buildings available from Angel Barracks, mainly painting them with leftover paint from other paintjobs. Mostly I'm doing these in metallics, as if they're being built from the scraps of ruined spaceships. The terrain will be a grey, moon-like finish when done (needs a final drybrushing). These aren't quite done yet, but I've blocked in most of the bigger panels.
These are some sci-fi Jetson-like urban buildings built from trophy/plaque bases, as someone demonstrated once on The Miniatures Page. These are 3 of the 5 I did, and have been primed, but the grey was darker than I anticipated, so I need to hand paint them a lighter grey. The others will be yellow and white. I need to improve my technique a bit, as too much grain is showing from up close, but I'll live with these ones.
Some JR Miniatures huts, for fantasy and any future ancients or medieval projects in 6mm.
A wall section for my 6mm High Elven city. A few years ago I picked up some fancy wood trim on sale for cheap at the local craft superstore, and finally found a use for it. The wall itself is just a strip of balsa, with the blocks scribed in, and the trim glued to the top and later cut. I have enough for a 36" wide by 12" deep portion of the city (sitting on the table's edge) and a small 8"x6" or so fortress. The wall sections will be interrupted by towers, also scribed and then capped by some fancy wood bits to look like organic-inspired towers. Those will be shown once I get them coated with sandable sealer.
Inside the elven city will be a large water fountain, with these statue of an elven hero standing in the middle. He's actually an old 25mm fantasy figure, making the statue about 25' tall. As usual, photographing white didn't turn out so well, but he's been painted a winter white and drybrushed with a metallic white to make him look like marble, with a gold staff and sitting on a jade base.
And here's most of what else got started in August. At the back centre-left is a Simply 6 ruined building; back centre-right is one of those Gamecraft city ruins I mentioned above. This was the demo one (to see if the matt board warped when primed - it didn't), it still needs to be painted properly. In front of it is a ruined cathedral, in the process of being primed with black gesso. Also in the pic are two ruined castles from JR Miniatures, a ruined bridge and farm complex from Simply 6, three Baccus bridges, and some Baccus stone fences (bottom left).
Subscribe to:
Posts (Atom)